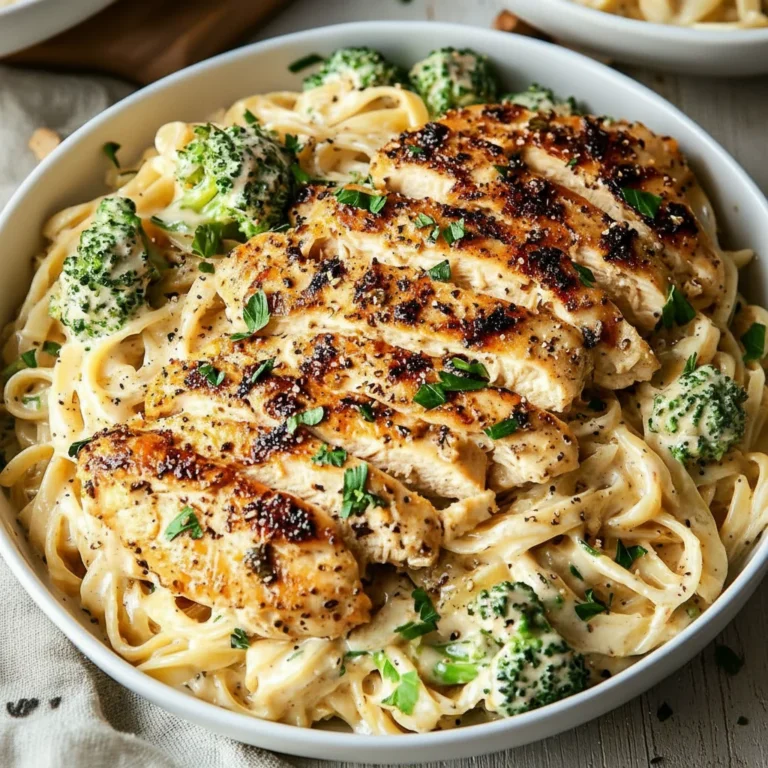
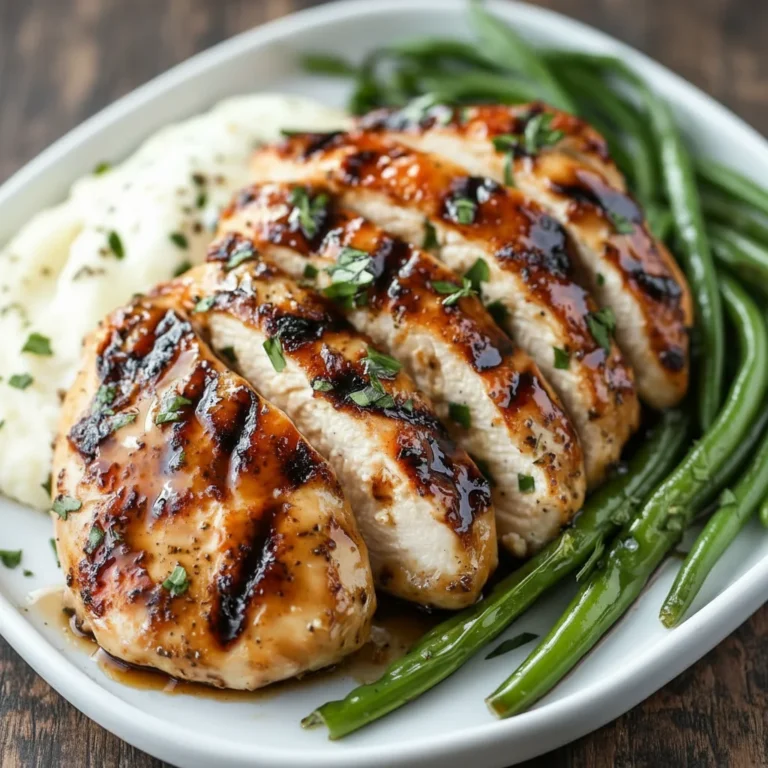
Garlic Butter Chicken Skillet
There’s a certain magic that happens when garlic, butter, and chicken come together in a hot skillet. The aroma that fills the kitchen is instantly comforting, promising a meal that is both satisfying and full of flavour. This Garlic Butter Chicken Skillet is the embodiment of that promise. It’s a stove top chicken dish that looks and tastes far more complex than it actually is, making it one of my secret weapons for a delicious weeknight dinner. While we often enjoy dishes with more elaborate sauces, like my Sticky Sweet Teriyaki Chicken Bowls, there is an undeniable elegance in the simplicity of this garlic butter sauce.
This was inspired by a dish I had at a little restaurant in Spain, where the focus was entirely on a few high-quality ingredients cooked perfectly. Here, tender chicken breasts are pan-seared until they have a beautiful golden crust, then they are bathed in a luscious sauce made from melted butter, heaps of fresh garlic, a splash of chicken stock, and a squeeze of bright lemon juice. Finished with a generous scattering of fresh parsley, the result is a dish that feels both rustic and refined.
It’s the kind of meal that works wonderfully when you’re short on time but refuse to compromise on taste. It’s substantial enough to be the star of the dinner table, and it’s a recipe that everyone seems to love. Serve it with crusty bread for mopping up every last drop of that incredible sauce, and you have a meal that will make any evening feel a little more special.
Recipe Overview
This Garlic Butter Chicken Skillet recipe is a straightforward, one-pan meal that delivers on flavour without demanding hours in the kitchen. We focus on creating a beautiful sear on the chicken to lock in its juices, then building a simple yet potent pan sauce right in the same skillet. I’ve tested this with both chicken breasts and thighs, and while both are lovely, the breasts cook just a tad faster, making them ideal for a 30-minute meal.
- Prep Time: 10 minutes
- Cook Time: 20 minutes
- Total Time: 30 minutes
- Servings: 4 people
- Difficulty: Easy
Why You’ll Love This Garlic Butter Chicken Skillet
- Genuine Flavour: The sauce is the true heart of this dish. It’s an intense, savoury blend of rich butter and pungent, freshly minced garlic, balanced perfectly by the acidity of lemon juice and the freshness of parsley. It coats the chicken beautifully.
- Ready in Under 30 Minutes: From start to finish, this entire dinner recipe is on the table in about 30 minutes, making it a reliable choice for busy weeknights.
- A Flexible Recipe: Feel free to add a handful of spinach at the end and let it wilt into the sauce, or toss in some halved cherry tomatoes for a burst of sweetness. You can easily adapt it to what you have on hand.
- Great for a Casual Dinner: This dish is relaxed enough for a Tuesday night but feels special enough to serve when you have friends over for a casual meal. It always gets compliments.
- Family Tested: My family adores this. My youngest always insists on having a slice of bread dedicated solely to mopping up the pan. It’s a clean-plate-club guarantee in our house!
Ingredients You’ll Need
We’re using simple, high-quality ingredients that you likely already have. For the butter, I always reach for a good quality salted butter, as it adds an extra layer of flavour right from the start. If you use unsalted, just be sure to taste and adjust the salt at the end.
- 4 medium chicken breasts (approx. 150-170g each), pounded to an even thickness
- 30g plain flour
- 1 tsp fine sea salt
- ½ tsp freshly ground black pepper
- 2 tbsp olive oil
- 80g salted butter
- 6-8 large cloves of garlic, finely minced
- 120ml good-quality chicken stock
- 1 tbsp fresh lemon juice
- A large handful of fresh flat-leaf parsley, finely chopped (about 25g)
- ¼ tsp red pepper flakes (optional, for a little heat)
Elena’s Tip: Don’t be shy with the garlic! I use 6 large cloves, but if you’re a true garlic aficionado, feel free to add another one or two. Mincing it fresh is absolutely key – the pre-chopped garlic you find in jars just doesn’t have the same vibrant, aromatic punch.
How to Make Garlic Butter Chicken Skillet
The process for this chicken skillet recipe is all about building layers of flavour in one pan. We’ll start by searing the chicken to perfection, then use the same pan to create that irresistible garlic butter sauce.
- Prepare the Chicken: Pat the chicken breasts completely dry with a paper towel. This is crucial for getting a good sear. In a shallow bowl, mix together the plain flour, salt, and pepper. Lightly dredge each chicken breast in the flour mixture, shaking off any excess.
- Sear the Chicken: Place a large, heavy-bottomed frying pan or cast-iron skillet over a medium-high heat. Add the olive oil. Once the oil is shimmering, carefully place the chicken breasts in the pan. Cook for 5-7 minutes on each side, without moving them too much, until they are golden brown and cooked through. The internal temperature should reach 74°C. Remove the chicken from the pan and set it aside on a plate.
- Start the Sauce: Reduce the heat to medium-low. Add the butter to the same skillet. Once it has melted and is foaming gently, add the minced garlic and optional red pepper flakes. Sauté for about 60 seconds, stirring constantly, until the garlic is fragrant. Be very careful not to let it burn, as it will become bitter.
- Deglaze the Pan: Pour in the chicken stock and fresh lemon juice. Use a wooden spoon to scrape up any browned bits (the fond) from the bottom of the pan. These bits are packed with flavour and will enrich your sauce.
- Simmer and Reduce: Bring the sauce to a gentle simmer and let it cook for 2-3 minutes, allowing it to reduce slightly and the flavours to meld together.
- Bring It All Together: Return the seared chicken breasts to the skillet, along with any juices that have collected on the plate. Spoon the garlic butter sauce over the chicken to coat it completely. Let it warm through for another minute. What works best for me is tilting the pan slightly to easily spoon the sauce over the top.
- Finish and Serve: Turn off the heat and stir in the chopped fresh parsley. Serve the Garlic Butter Chicken immediately, with extra sauce spooned over the top.
Tips From My Kitchen
- Temperature Control is Key: The most common mistake is burning the garlic. After you sear the chicken, your pan will be quite hot. Make sure to lower the heat significantly before adding the butter and garlic. You’re looking for a gentle sizzle, not a frantic fry.
- The Secret Step: I learned that scraping the bottom of the pan after adding the chicken stock (a process called deglazing) is absolutely non-negotiable. It seems like a small thing, but that is where the deep, savoury foundation of your pan sauce comes from.
- Make-Ahead Prep: To get dinner on the table even faster, you can mince your garlic and chop your parsley in the morning. Keep them in separate airtight containers in the fridge. You can also pre-mix your flour and seasonings.
- Storing Leftovers: Store any leftovers in an airtight container in the refrigerator for up to 3 days. Reheat gently in a covered pan over a low heat with a splash of water or chicken stock to loosen the sauce and prevent the chicken from drying out.
Equipment You’ll Need
You don’t need any fancy gadgets for this straightforward dinner recipe. A few kitchen basics are all it takes.
- Large frying pan or cast-iron skillet (about 30cm)
- Sharp knife and cutting board
- Shallow bowl for dredging
- Tongs or a spatula
Delicious Variations to Try
Once you’ve mastered the basic recipe, it’s fun to experiment. The garlic butter sauce is a wonderful canvas for other flavours.
- Add Creaminess: Stir in 60ml of double cream at the end for a richer, creamier sauce.
- Add Vegetables: Sauté some sliced mushrooms in the pan after you remove the chicken, or wilt a large handful of fresh spinach into the sauce just before serving.
- Different Protein: This sauce is fantastic with other proteins. Try it with pork chops, firm white fish like cod, or even large prawns. For prawns, like in my Savory Garlic Butter Shrimp For Dinner recipe, you’ll only need to cook them for a few minutes until they turn pink.
What to Serve With Garlic Butter Chicken Skillet
This dish pairs beautifully with sides that can soak up every bit of that delicious sauce.
- Creamy Mashed Potatoes: The ultimate partner for the garlic butter sauce. The fluffy potatoes are the perfect vehicle for mopping up the pan.
- Steamed Green Beans or Asparagus: A simple, crisp green vegetable provides a lovely colour and texture contrast to the rich chicken.
- Crusty Bread: A fresh baguette or sourdough is essential for ensuring no drop of sauce goes to waste.
- Wine Pairing: A crisp, dry white wine like a Sauvignon Blanc or Pinot Grigio cuts through the richness of the butter and complements the lemon and garlic.
Frequently Asked Questions
Garlic Butter Chicken Skillet
Ingredients
Method
- Prepare the Chicken: Pat the chicken breasts completely dry with a paper towel. This is crucial for getting a good sear. In a shallow bowl, mix together the plain flour, salt, and pepper. Lightly dredge each chicken breast in the flour mixture, shaking off any excess.
- Sear the Chicken: Place a large, heavy-bottomed frying pan or cast-iron skillet over a medium-high heat. Add the olive oil. Once the oil is shimmering, carefully place the chicken breasts in the pan. Cook for 5-7 minutes on each side, without moving them too much, until they are golden brown and cooked through. The internal temperature should reach 74°C. Remove the chicken from the pan and set it aside on a plate.
- Start the Sauce: Reduce the heat to medium-low. Add the butter to the same skillet. Once it has melted and is foaming gently, add the minced garlic and optional red pepper flakes. Sauté for about 60 seconds, stirring constantly, until the garlic is fragrant. Be very careful not to let it burn, as it will become bitter.
- Deglaze the Pan: Pour in the chicken stock and fresh lemon juice. Use a wooden spoon to scrape up any browned bits (the fond) from the bottom of the pan. These bits are packed with flavour and will enrich your sauce.
- Simmer and Reduce: Bring the sauce to a gentle simmer and let it cook for 2-3 minutes, allowing it to reduce slightly and the flavours to meld together.
- Bring It All Together: Return the seared chicken breasts to the skillet, along with any juices that have collected on the plate. Spoon the garlic butter sauce over the chicken to coat it completely. Let it warm through for another minute. What works best for me is tilting the pan slightly to easily spoon the sauce over the top.
- Finish and Serve: Turn off the heat and stir in the chopped fresh parsley. Serve the Garlic Butter Chicken immediately, with extra sauce spooned over the top.
Notes
I truly hope this Garlic Butter Chicken Skillet brings as much joy to your dinner table as it does to mine. It’s one of those recipes that proves you don’t need a long list of complicated ingredients to create something genuinely delicious. It’s a testament to good ingredients cooked with a little bit of care. I’d love to hear how you get on with it, so please leave a comment below and share your experience!
Happy cooking,
Elena