Mini Cheeseburger Sliders Party Food
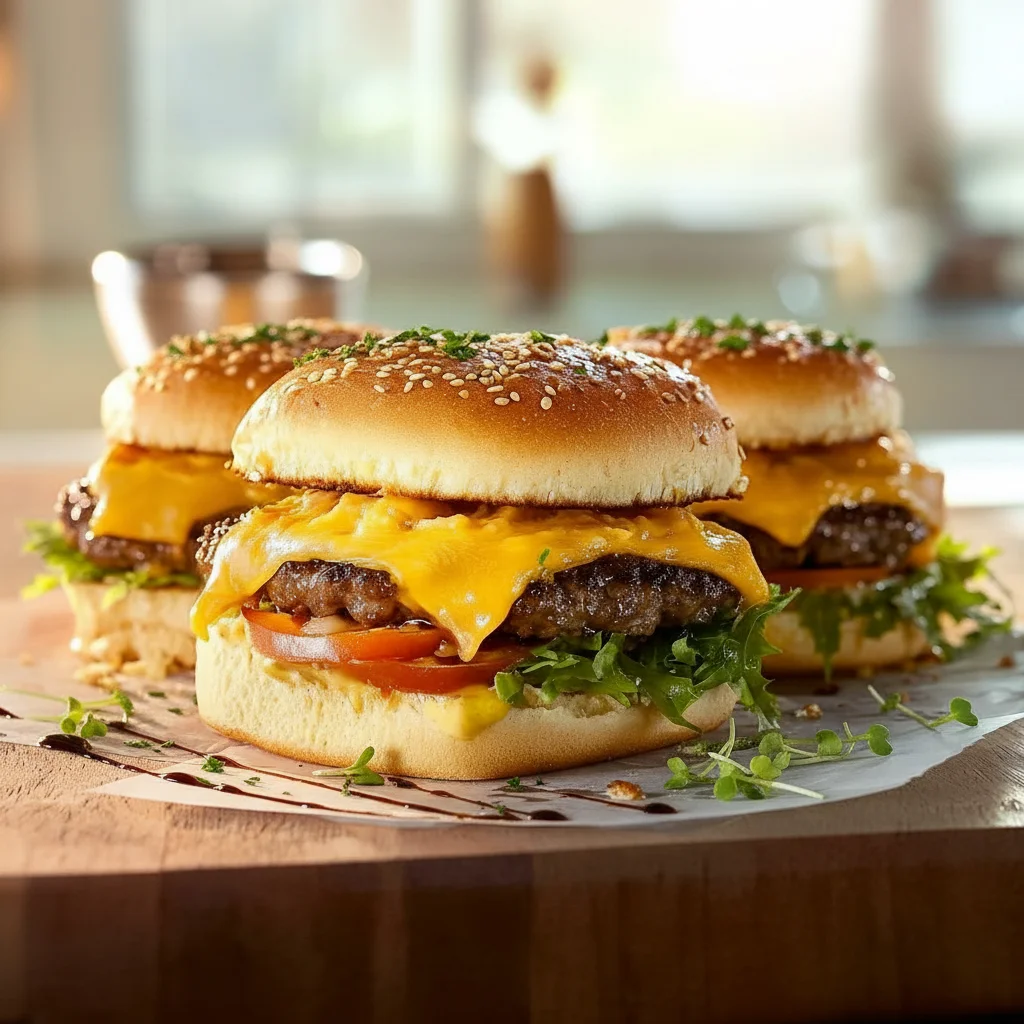
There’s something truly special about the moment you bring a tray of warm, golden-topped sliders to the table. The aroma of baked bread, savoury beef, and melted cheese fills the air, and you know you’ve made something that everyone is going to gather around. These Cheeseburger Sliders are more than just mini burgers; they’re a shared experience, baked together in one pan so the flavours meld into something wonderfully cohesive. I’ve been making this for over 7 years, and it never disappoints.
What makes this particular recipe stand out is the balance of textures and tastes. We’re talking about juicy, seasoned beef mince layered over soft brioche buns, topped with gloriously melty cheddar cheese, a tangy homemade burger sauce, and a final brush of garlic-parsley butter that crisps the tops to perfection. It’s the essence of a great cheeseburger, transformed into a format that’s brilliant for sharing.
This is the kind of dish that works beautifully for a weekend family dinner, a casual get-together with friends, or as the star of your party food spread. It feels like a treat but comes together in about 35 minutes, making it a reliable and delightful option whenever you need to feed a happy group.
Recipe Overview
These Cheeseburger Sliders capture all the classic flavours you love in a convenient, shareable form. A single layer of seasoned beef is cooked and layered with cheese and sauce between soft buns, then baked until hot and bubbly. I’ve found that adding a dash of Worcestershire sauce to the beef mince really deepens the savoury flavour, giving it a fantastic umami base that sets it apart.
- Prep Time: 15 minutes
- Cook Time: 20 minutes
- Total Time: 35 minutes
- Servings: 12 sliders (serves 4-6 people)
- Difficulty: Easy
Why You’ll Love This Cheeseburger Sliders Recipe
- Genuine Flavour: Each bite delivers the satisfying taste of a classic cheeseburger: juicy, well-seasoned beef, sharp cheddar cheese that pulls beautifully, a tangy note from the gherkins, all encased in a soft, garlic-buttered brioche bun.
- Ready in Under 40 Minutes: From chopping the onion to pulling the golden tray from the oven, this entire meal is on the table in about 35 minutes. It’s ideal when you want something substantial without spending hours in the kitchen.
- Flexible Recipe: This recipe is a fantastic starting point. You can easily add a layer of crispy cooked bacon, swap the cheddar for Swiss cheese, or stir some finely diced jalapeños into the beef mixture for a spicy kick.
- Great for Gatherings: These Burger Sliders are designed for sharing. They work wonderfully for game nights, children’s parties, or as a laid-back meal with friends where everyone can just pull a slider from the tray.
- Family Tested: My whole family adores these. The individual portions are great for little hands, and the familiar cheeseburger flavour always gets compliments from adults and kids alike.

Ingredients You’ll Need
The ingredients for these sliders are straightforward and easy to find at any supermarket. For the best result, I recommend using a good quality beef mince with around 20% fat content; it ensures the filling stays moist and flavourful. It makes a huge difference compared to leaner options.
- 500g beef mince (20% fat is ideal)
- 1 medium brown onion, finely diced
- 2 cloves garlic, minced
- 1 tsp Worcestershire sauce
- 1/2 tsp salt
- 1/4 tsp black pepper
- 12 slider buns (brioche style works best)
- 8 slices mature cheddar cheese
- For the Burger Sauce:
- 100g mayonnaise
- 2 tbsp tomato ketchup
- 1 tsp American mustard
- 2 large gherkins (dill pickles), finely chopped
- For the Topping:
- 50g unsalted butter, melted
- 1/2 tsp garlic powder
- 1 tbsp fresh parsley, finely chopped
- 1 tbsp sesame seeds
Elena’s Tip: Don’t be tempted to use pre-shredded cheese. Slicing your own from a block or using pre-sliced cheese gives you a much better melt that covers the beef evenly and creates that satisfying cheese pull.
How to Make Cheeseburger Sliders
The process for making these burger sliders is all about layering flavours efficiently. We’ll cook the filling, prepare the buns, and assemble everything in one dish for a simple bake.
- Preheat and Prepare: Preheat your oven to 180°C (160°C fan). Lightly grease a 23x33cm (9×13 inch) baking dish.
- Cook the Aromatics: Heat a large frying pan over a medium heat. Add the finely diced onion and cook for 4-5 minutes until it has softened and become translucent. Add the minced garlic and cook for another minute until fragrant.
- Brown the Beef: Add the beef mince to the pan. Use a wooden spoon to break it up as it cooks. Brown the meat for 5-7 minutes until no pink remains. Drain off any excess fat from the pan.
- Season the Filling: Stir the Worcestershire sauce, salt, and pepper into the cooked beef mixture. Take it off the heat and set aside. While that cools slightly, mix the mayonnaise, ketchup, mustard, and chopped gherkins in a small bowl to create the burger sauce.
- Prepare the Buns: Take your slab of slider buns and, without separating them, use a large serrated knife to slice the entire block in half horizontally. Place the bottom half into your prepared baking dish.
- Assemble the Sliders: Spread the burger sauce evenly over the bottom layer of buns. Next, spoon the beef mixture over the sauce, pressing it down gently into an even layer. Lay the cheddar cheese slices on top of the beef, ensuring it’s fully covered. Place the top half of the buns back on.
- Add the Topping: In a small bowl, mix the melted butter with the garlic powder and chopped parsley. What works best for me is using a silicone pastry brush to spread this mixture generously over the tops of the buns. Sprinkle evenly with sesame seeds.
- Bake to Perfection: Cover the dish with foil and bake for 10 minutes. Then, remove the foil and bake for another 8-10 minutes, or until the cheese is completely melted and bubbling, and the tops of the buns are golden brown.
- Rest and Serve: Let the sliders rest in the dish for 5 minutes before serving. This helps them hold together. Use a sharp knife to cut along the lines of the individual buns and serve immediately.
Tips From My Kitchen
- Temperature Control: Sticking to 180°C (160°C fan) is important. A hotter oven might burn the buttery topping and sesame seeds before the cheese inside has a chance to become perfectly gooey and melted.
- The Secret Step: I learned that pressing the beef mixture down into an even, compact layer is the key to sliders that hold together. It prevents the filling from falling out when you lift one from the tray and ensures a consistent bite every time.
- Make-Ahead: You can cook the beef and onion mixture up to a day in advance. Let it cool completely and store it in an airtight container in the fridge. This makes assembly on the day incredibly fast.
- Storage: Store any leftover sliders in an airtight container in the fridge for up to 3 days. To reheat, place them on a baking tray in an oven preheated to 160°C for about 10 minutes, or until warmed through. This helps re-crisp the buns.
Equipment You’ll Need
- Large frying pan or skillet
- 23x33cm (9×13 inch) baking dish
- Sharp serrated knife and cutting board
- Mixing bowls
- Silicone pastry brush
- Wooden spoon or spatula
Common Mistakes to Avoid
- Overcrowding the pan: When you first add the beef mince to the pan, make sure it has enough space. If your pan is too small, the meat will steam instead of brown, and you’ll miss out on the deep, savoury flavour developed through the Maillard reaction. Use a large pan or cook the mince in two batches if necessary.
- Soggy Buns: If you’re worried about the bottom buns getting soft, you can lightly toast them. Before assembling, place the bottom half of the buns under the grill for 1-2 minutes until just lightly golden. This creates a small barrier against the sauce.
- Skipping the Rest Time: It can be tempting to serve these straight from the oven, but that 5-minute rest is crucial. It allows the melted cheese to set slightly, so the sliders are much easier to cut and serve without the filling spilling out everywhere.
Delicious Variations to Try
Once you’ve mastered the classic version, it’s fun to get creative. These sliders are an excellent base for all sorts of flavour combinations. You could even get inspired by other cheesy recipes like this Cheesy Tuna Melt Sandwich Recipe.
- Spicy Bacon Version: Add 6-8 slices of crispy, crumbled bacon on top of the cheese layer before putting the top buns on. For a bit of heat, mix 1-2 finely chopped jalapeños into the beef.
- Vegetarian Option: This recipe works brilliantly with a plant-based mince. Follow the exact same steps, simply substituting the beef mince for your favourite vegetarian or vegan alternative and using vegan cheese and butter.
- Turkey Burger Sliders: For a leaner option, use turkey mince instead of beef. As turkey is less fatty, you might want to add a tablespoon of olive oil to the pan when cooking the onion.
What to Serve With Cheeseburger Sliders
These are quite rich and satisfying on their own, but a few simple sides can turn them into a complete meal. For another fun, shareable main, consider making some Smoky Grilled Chicken Skewers alongside.
- Crispy Potato Wedges: A classic pairing. The crunchy texture of oven-baked wedges is a great contrast to the soft sliders.
- A Sharp, Simple Coleslaw: A refreshing, crunchy coleslaw with a vinegar-based dressing helps cut through the richness of the cheese and beef.
– **Drink Pairing:** A cold, crisp lager or a pale ale complements the savoury flavours perfectly. For a non-alcoholic option, a classic lemonade is always a great choice.
Frequently Asked Questions
Cheeseburger Sliders
Ingredients
Method
- Preheat and Prepare: Preheat your oven to 180°C (160°C fan). Lightly grease a 23x33cm (9x13 inch) baking dish.
- Cook the Aromatics: Heat a large frying pan over a medium heat. Add the finely diced onion and cook for 4-5 minutes until it has softened and become translucent. Add the minced garlic and cook for another minute until fragrant.
- Brown the Beef: Add the beef mince to the pan. Use a wooden spoon to break it up as it cooks. Brown the meat for 5-7 minutes until no pink remains. Drain off any excess fat from the pan.
- Season the Filling: Stir the Worcestershire sauce, salt, and pepper into the cooked beef mixture. Take it off the heat and set aside. While that cools slightly, mix the mayonnaise, ketchup, mustard, and chopped gherkins in a small bowl to create the burger sauce.
- Prepare the Buns: Take your slab of slider buns and, without separating them, use a large serrated knife to slice the entire block in half horizontally. Place the bottom half into your prepared baking dish.
- Assemble the Sliders: Spread the burger sauce evenly over the bottom layer of buns. Next, spoon the beef mixture over the sauce, pressing it down gently into an even layer. Lay the cheddar cheese slices on top of the beef, ensuring it's fully covered. Place the top half of the buns back on.
- Add the Topping: In a small bowl, mix the melted butter with the garlic powder and chopped parsley. What works best for me is using a silicone pastry brush to spread this mixture generously over the tops of the buns. Sprinkle evenly with sesame seeds.
- Bake to Perfection: Cover the dish with foil and bake for 10 minutes. Then, remove the foil and bake for another 8-10 minutes, or until the cheese is completely melted and bubbling, and the tops of the buns are golden brown.
- Rest and Serve: Let the sliders rest in the dish for 5 minutes before serving. This helps them hold together. Use a sharp knife to cut along the lines of the individual buns and serve immediately.
Notes
I really hope you give these Cheeseburger Sliders a try. They are such a joy to make and even more of a joy to share. There’s nothing better than seeing family and friends reach for a second (or third!) one. Let me know how yours turn out in the comments below – I’d love to hear about it!