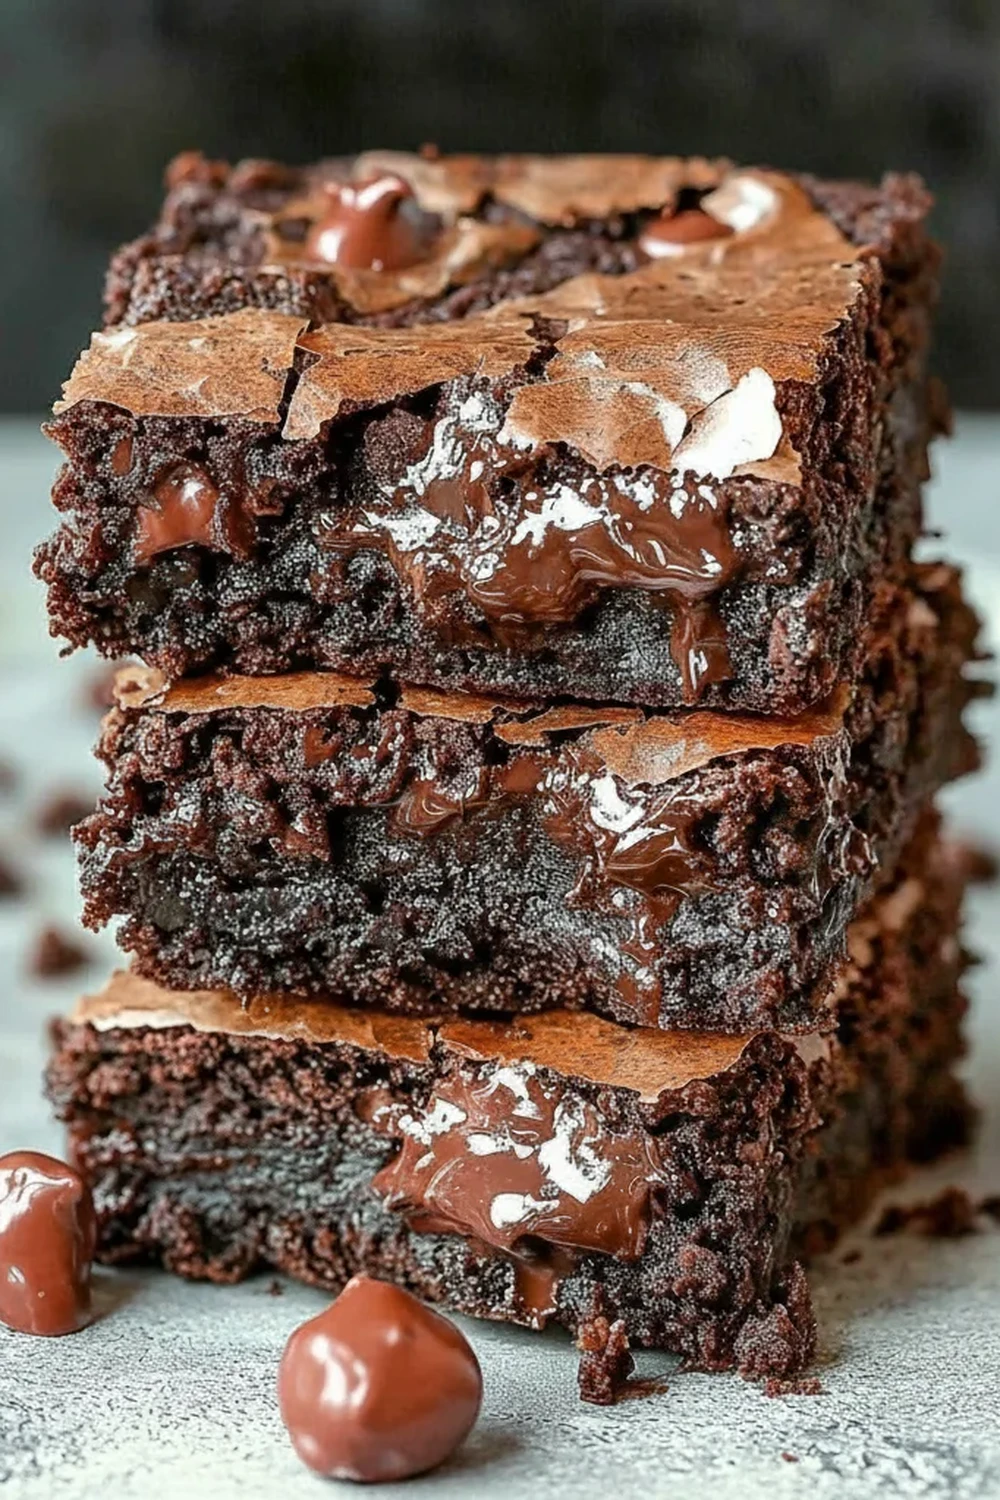
Healthy Greek Yogurt Brownies
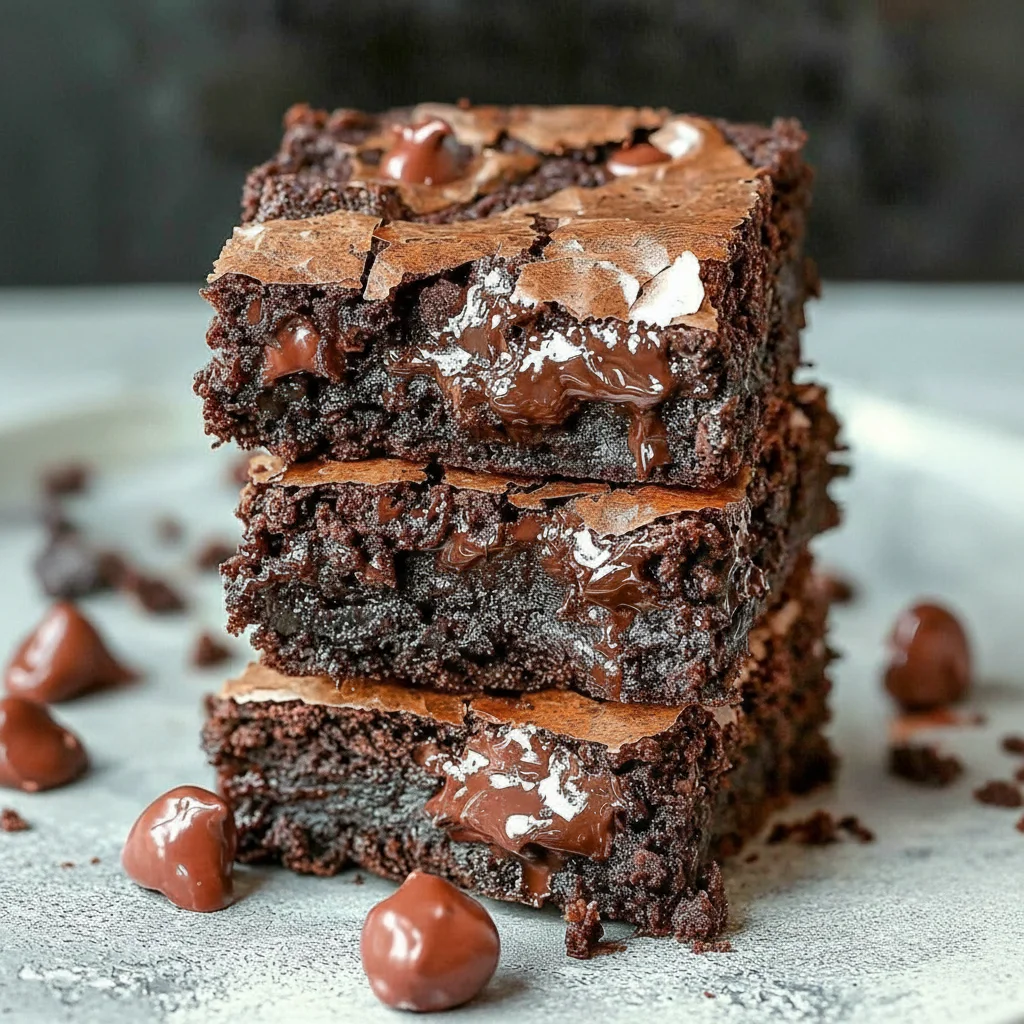
There are moments in the kitchen when you stumble upon a combination so brilliant, you wonder why you hadn’t tried it sooner. For me, that was the day I decided to add a generous dollop of Greek yoghurt to my classic brownie batter. The result was nothing short of a revelation: incredibly fudgy, intensely chocolatey brownies with a texture so moist and dense, it’s hard to believe they’re a lighter take on the original. My kids absolutely devour this every time I make it, and honestly, so do I.
These aren’t just any brownies; they are a testament to the magic of good ingredients. The rich, slightly tangy character of the Greek yoghurt doesn’t just add moisture; it balances the sweetness and deepens the cocoa flavour, creating a sophisticated chocolate recipe that feels both indulgent and wholesome. The tops bake to a beautiful, delicate crackle, while the inside remains profoundly fudgy and satisfying. It’s the kind of bake that works beautifully for an afternoon treat with a cup of tea, or as a simple dessert after a lovely meal like my Smoky Grilled Chicken Skewers.
We’re going to walk through how to create these gorgeous Greek Yogurt Brownies from scratch. Forget the box mix; this recipe is straightforward and uses ingredients you likely already have. The process is a joy in itself, filling your home with that unbeatable aroma of melting chocolate and baking cocoa. It’s a recipe I return to time and again, and I’m so excited to share it with you.
Recipe Overview
These Greek Yogurt Brownies deliver an exceptionally moist and fudgy texture, thanks to the addition of full-fat Greek yoghurt. The flavour is deeply chocolatey with a subtle, pleasant tang that cuts through the richness, preventing them from being overly sweet. When testing this recipe, I found that letting the brownies cool completely is the key to achieving that perfect dense, chewy centre.
- Prep Time: 15 minutes
- Cook Time: 25-30 minutes
- Total Time: 45 minutes (plus cooling)
- Servings: 16 small squares
- Difficulty: Easy
Why You’ll Love These Greek Yogurt Brownies
- Intensely Fudgy Texture: The Greek yoghurt creates a wonderfully dense and moist crumb that melts in your mouth. It’s the opposite of a dry, cakey brownie.
- Comes Together in Under an Hour: From gathering your ingredients to pulling the tray out of the oven, this recipe is designed to be efficient without compromising on quality.
- A Versatile Chocolate Recipe: This batter is a brilliant canvas for additions. We love folding in a handful of walnuts for crunch, some extra dark chocolate chunks, or even a swirl of raspberry jam before baking.
- Ideal for Weekend Baking: This is a wonderful recipe for a relaxed Sunday afternoon. It’s simple enough for children to help with and makes the house smell absolutely divine.
- Family Tested and Approved: This recipe always gets compliments in my house. My husband, who’s usually picky about his desserts, asked for seconds the first time I made them!
Ingredients You’ll Need
For the best results, I always recommend using full-fat Greek yoghurt, like Fage Total 5%. Its thick, creamy consistency is what helps create that unbelievably fudgy texture. Also, using a good quality dark chocolate and cocoa powder will make a world of difference to the final flavour.
- 120g unsalted butter, cubed
- 150g dark chocolate (70% cocoa solids), roughly chopped
- 180g caster sugar
- 2 large free-range eggs, at room temperature
- 1 tsp vanilla extract
- 150g full-fat plain Greek yoghurt, at room temperature
- 80g plain flour
- 40g unsweetened cocoa powder (I use Dutch-processed for a deeper flavour)
- ½ tsp baking powder
- ¼ tsp fine sea salt
- 100g dark chocolate chips or chunks (optional, for extra gooeyness)
Elena’s Tip: Ensure your eggs and Greek yoghurt are at room temperature. This helps them incorporate smoothly into the batter, preventing it from splitting and resulting in a more uniform, velvety texture.
How to Make Greek Yogurt Brownies
This process is wonderfully methodical. We start by melting the butter and chocolate together to create a rich, glossy base, then carefully fold in the remaining ingredients. The key is to mix just enough to combine everything, as over-mixing can lead to a tougher, cake-like texture.
- Prepare Your Tin: Preheat your oven to 180°C (160°C fan). Grease a 20cm (8-inch) square baking tin and line it with baking parchment, leaving some overhang on the sides to act as handles for easy removal later.
- Melt Chocolate and Butter: In a medium, heatproof bowl set over a saucepan of gently simmering water (a bain-marie), melt the butter and chopped dark chocolate together. Stir occasionally until smooth and glossy. You can also do this in the microwave in 30-second bursts. Once melted, remove from the heat and set aside to cool for about 5-10 minutes.
- Whisk Eggs and Sugar: In a separate large bowl, using an electric hand mixer or a stand mixer with the whisk attachment, beat the caster sugar and eggs together on medium-high speed for 3-4 minutes. The mixture should become pale, thick, and significantly increase in volume. Whisk in the vanilla extract.
- Combine Wet Ingredients: Gently pour the cooled chocolate-butter mixture into the whisked eggs and sugar. Fold it in carefully with a spatula until just combined. Next, add the Greek yoghurt and fold again until the batter is uniform.
- Add Dry Ingredients: Sift the plain flour, cocoa powder, baking powder, and salt directly into the wet mixture. What works best for me is to fold these in with a large metal spoon or spatula in gentle figure-of-eight motions. Stop mixing as soon as you no longer see streaks of flour. It’s crucial not to over-mix at this stage.
- Fold in Chocolate Chips: If using, gently fold in the 100g of chocolate chips or chunks.
- Bake to Perfection: Pour the batter into your prepared tin and smooth the top with your spatula. Bake for 25-30 minutes. The top should have a shiny, crackly crust and the edges should be set. To check for doneness, a skewer inserted into the centre should come out with moist, fudgy crumbs attached, not wet batter.
- Cool Completely: This is the hardest part! Allow the brownies to cool completely in the tin on a wire rack. This allows them to set properly, ensuring a dense, fudgy texture. Once cool, use the parchment handles to lift them out and slice into 16 squares.
Tips From My Kitchen
- Yoghurt Temperature Matters: Using cold Greek yoghurt straight from the fridge can cause the melted chocolate and butter mixture to seize up. Letting it come to room temperature for 30 minutes makes all the difference for a silky smooth batter.
- The Secret to a Crackly Top: Whisking the eggs and sugar until they are pale and thick creates a light meringue-like layer on top of the batter as it bakes. This is what gives you that beautiful, paper-thin crackly crust. Don’t skip this step!
- Don’t Overbake: The biggest mistake with any brownie recipe is leaving it in the oven for too long. An extra minute or two can be the difference between fudgy and cakey. I learned that it’s always better to err on the side of underbaking, as the brownies will continue to cook and set from the residual heat in the tin.
- Storage for Ultimate Fudginess: Store the cooled brownies in an airtight container at room temperature for up to 3 days. For an even denser, chewier texture, I like to store them in the fridge, where they will keep well for up to a week.
Equipment You’ll Need
- Stand mixer or electric hand mixer
- 20cm (8-inch) square baking tin
- Baking parchment
- Wire cooling rack
- Mixing bowls and spatula
Delicious Variations to Try
This brownie recipe is a fantastic starting point. Once you’ve mastered the basic version, feel free to get creative with different flavours and textures.
- Nutty Crunch: Fold in 80g of toasted, chopped walnuts, pecans, or hazelnuts along with the chocolate chips for a wonderful textural contrast.
- Espresso Kick: Add 1 teaspoon of instant espresso powder along with the cocoa powder. Coffee has a magical ability to intensify the flavour of chocolate without making the brownies taste like coffee.
- Fruity Swirl: After pouring the batter into the tin, dollop a few spoonfuls of raspberry or cherry jam on top and use a skewer to create a gentle swirl pattern before baking.
What to Serve With Greek Yogurt Brownies
While these are perfectly delicious on their own, a simple accompaniment can elevate them into a truly special dessert, ideal after a lighter main like a Cheesy Tuna Melt Sandwich for a comforting lunch.
- A Dollop of Cream: A spoonful of clotted cream, crème fraîche, or even more Greek yoghurt provides a creamy, tangy counterpoint to the rich chocolate.
- Vanilla Bean Ice Cream: The classic pairing. The warmth of a slightly heated brownie against the cold, creamy ice cream is a timeless combination.
- Fresh Berries: A small handful of fresh raspberries or sliced strawberries adds a burst of freshness and a touch of acidity that cuts through the richness beautifully.
Frequently Asked Questions
Greek Yogurt Brownies
Ingredients
Method
- Prepare Your Tin: Preheat your oven to 180°C (160°C fan). Grease a 20cm (8-inch) square baking tin and line it with baking parchment, leaving some overhang on the sides to act as handles for easy removal later.
- Melt Chocolate and Butter: In a medium, heatproof bowl set over a saucepan of gently simmering water (a bain-marie), melt the butter and chopped dark chocolate together. Stir occasionally until smooth and glossy. You can also do this in the microwave in 30-second bursts. Once melted, remove from the heat and set aside to cool for about 5-10 minutes.
- Whisk Eggs and Sugar: In a separate large bowl, using an electric hand mixer or a stand mixer with the whisk attachment, beat the caster sugar and eggs together on medium-high speed for 3-4 minutes. The mixture should become pale, thick, and significantly increase in volume. Whisk in the vanilla extract.
- Combine Wet Ingredients: Gently pour the cooled chocolate-butter mixture into the whisked eggs and sugar. Fold it in carefully with a spatula until just combined. Next, add the Greek yoghurt and fold again until the batter is uniform.
- Add Dry Ingredients: Sift the plain flour, cocoa powder, baking powder, and salt directly into the wet mixture. What works best for me is to fold these in with a large metal spoon or spatula in gentle figure-of-eight motions. Stop mixing as soon as you no longer see streaks of flour. It's crucial not to over-mix at this stage.
- Fold in Chocolate Chips: If using, gently fold in the 100g of chocolate chips or chunks.
- Bake to Perfection: Pour the batter into your prepared tin and smooth the top with your spatula. Bake for 25-30 minutes. The top should have a shiny, crackly crust and the edges should be set. To check for doneness, a skewer inserted into the centre should come out with moist, fudgy crumbs attached, not wet batter.
- Cool Completely: This is the hardest part! Allow the brownies to cool completely in the tin on a wire rack. This allows them to set properly, ensuring a dense, fudgy texture. Once cool, use the parchment handles to lift them out and slice into 16 squares.
Notes
I really hope you enjoy making these Greek Yogurt Brownies as much as my family and I do. They’ve become a staple in our home for when we crave a proper chocolate fix that doesn’t feel overly heavy. It’s a truly rewarding bake that proves you don’t need a mountain of butter to achieve a gloriously fudgy dessert. If you try this recipe, please let me know how it turned out in the comments below! Happy baking, Elena.