Fudgy Chocolate Brownies Recipe
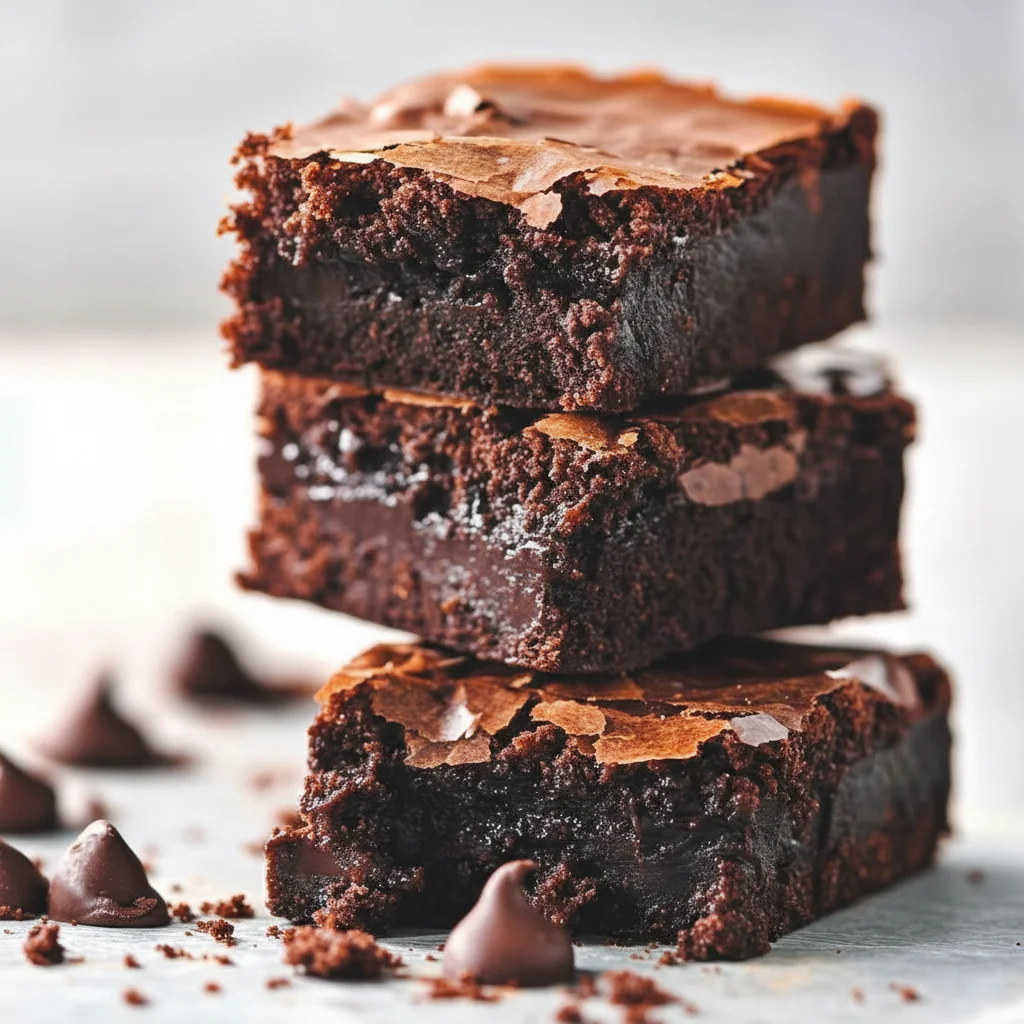
There is something uniquely comforting about the scent of rich chocolate baking in the oven. It’s a promise of pure indulgence, a signal that a truly wonderful treat is on its way. This brownies recipe is the result of years of tinkering in my kitchen to achieve what I believe is the ultimate chocolate brownie: deeply fudgy in the centre, chewy at the edges, and crowned with a beautifully thin, crackly top that shatters ever so slightly with each bite. I’ve been making this for over 4 years, and it never disappoints. It’s the one I turn to for a simple weekend bake or when friends are coming over for coffee.
Unlike cakey, airy brownies that can sometimes feel a bit disappointing, this recipe uses both melted dark chocolate and cocoa powder to create an intense, layered chocolate flavour that is sophisticated but not bitter. The secret lies in a precise method that guarantees that signature fudgy texture every single time. This is the kind of brownies dessert that chocolate purists dream of, and it’s a brilliant bake to master. It works beautifully for a cosy family movie night after a comforting meal like my Savory Beef And Broccoli Stir Fry Recipe, or as a simple yet impressive offering for a potluck.
Recipe Overview
This recipe delivers consistently rich and fudgy chocolate brownies with that sought-after shiny, paper-thin crust. The flavour is deeply chocolatey, thanks to a combination of high-quality dark chocolate and cocoa powder, with a texture that is dense and moist without being heavy. I’ve tested this with various additions, but I find that a handful of good-quality chocolate chips stirred in at the end takes them to another level, creating little molten pockets throughout.
- Prep Time: 15 minutes
- Cook Time: 25-30 minutes
- Total Time: 45 minutes (plus cooling time)
- Servings: 16 small squares
- Difficulty: Easy
Why You’ll Love This Brownies Recipe
- Intense Chocolate Flavour: We use both 70% dark chocolate and Dutch-processed cocoa powder. This combination provides a complex, robust chocolate taste that isn’t overly sweet, with the melted chocolate giving it that luxurious, fudgy quality.
- Ready in Under an Hour: From gathering your ingredients to pulling the tray from the oven, the whole process comes together in about 45 minutes, making it a wonderful option for a spontaneous baking session.
- A Forgiving & Flexible Recipe: The base is a fantastic canvas. You can stir in 100g of toasted walnuts or pecans for a bit of crunch, or even swirl through a few tablespoons of peanut butter or Biscoff spread just before baking.
- Ideal for Sharing: This recipe is great for taking to a casual gathering, a school bake sale, or simply sharing with neighbours. It always gets compliments and travels very well.
- Family Tested: My family adores these. They’ve become our go-to treat for celebrating small wins or just brightening up a grey afternoon. The pan is always empty by the next day!

Ingredients You’ll Need
For the best results, using good quality ingredients makes all the difference, especially the chocolate. I always use Green & Black’s 70% dark chocolate for its consistent melt and rich flavour profile. The combination of two sugars is also key to the final texture.
- 185g unsalted butter, cubed, plus extra for greasing
- 185g good-quality dark chocolate (at least 70% cocoa solids), broken into pieces
- 3 large free-range eggs, at room temperature
- 275g caster sugar
- 1 tsp vanilla extract
- 85g plain flour
- 40g cocoa powder (sifted)
- 1/4 tsp fine sea salt
- 100g milk or dark chocolate chips (optional)
Elena’s Tip: Don’t skip bringing your eggs to room temperature. Cold eggs can cause the melted butter and chocolate mixture to seize and solidify, affecting the final texture. Simply place them in a bowl of warm water for 10 minutes if you’re short on time.
How to Make This Brownies Recipe
The process for these chocolate brownies is straightforward. The most important part is the whisking of the eggs and sugar – this is what creates that iconic crackly top. Be careful not to overbake them to ensure a perfectly fudgy centre.
- Prepare Your Tin and Oven: Preheat your oven to 180°C (160°C fan/Gas Mark 4). Grease a 20cm (8-inch) square baking tin and line the base and sides with a single piece of baking parchment, leaving some overhang to help you lift the brownies out later.
- Melt the Chocolate and Butter: Place the cubed butter and broken dark chocolate in a heatproof bowl set over a saucepan of barely simmering water (a bain-marie). Make sure the bottom of the bowl doesn’t touch the water. Stir occasionally until everything is completely melted and smooth. Remove from the heat and set aside to cool slightly for 10-15 minutes.
- Whisk the Eggs and Sugar: In a separate large bowl, using an electric hand mixer or a stand mixer with the whisk attachment, beat the eggs, caster sugar, and vanilla extract together on high speed. I find that whisking for a good 5-7 minutes is essential. The mixture should become very pale, thick, and almost double in volume. You’ll know it’s ready when it leaves a ribbon-like trail on the surface when you lift the whisk.
- Combine Wet Ingredients: Gently pour the slightly cooled chocolate and butter mixture into the whisked egg mixture. Using a spatula, carefully fold them together until just combined. Be gentle here to avoid knocking out all the air you just incorporated.
- Fold in the Dry Ingredients: Sift the plain flour, cocoa powder, and salt directly over the bowl. Fold everything together gently until you can no longer see any streaks of flour.
- Add Extras: If you’re using them, stir through the chocolate chips or chopped nuts now.
- Bake the Brownies: Pour the batter into your prepared tin and smooth the top with your spatula. Bake on the middle shelf of the preheated oven for 25-30 minutes.
- Check for Doneness: To check if they’re ready, insert a skewer or cocktail stick into the centre. It should come out with moist, sticky crumbs attached. If it comes out with wet batter, they need a few more minutes. If it comes out clean, they may be overbaked.
- Cool Completely: This is a crucial step! Leave the brownies to cool completely in the tin, first on a wire rack for 30 minutes, and then you can pop them in the fridge for an hour to firm up if you like. This ensures a clean cut and a perfectly fudgy texture. Once cool, use the parchment paper overhang to lift the slab out and cut it into 16 squares.
Tips From My Kitchen
- Temperature Control: When melting the chocolate and butter, low and slow is the way to go. If the mixture gets too hot, it can become grainy. If you use a microwave, do it in 30-second bursts, stirring in between.
- The Secret Step: I learned that letting the melted chocolate cool down is non-negotiable. If it’s too hot when you add it to the whipped eggs, it can deflate the mixture, and you’ll lose the volume needed for that light, crackly top.
- Make-Ahead: These brownies are actually even better the day after they’re baked. The flavours have time to meld and deepen, and the texture becomes even fudgier. Just store them in their tin, covered, at room temperature.
- Storage: Store the cut brownies in an airtight container at room temperature. They will stay fresh and delicious for up to 4 days. You can also freeze them for up to 3 months.
Equipment You’ll Need
- Electric hand mixer or stand mixer
- 20cm (8-inch) square baking tin
- Baking parchment
- Wire cooling rack
- Heatproof bowl and saucepan (for bain-marie)
- Spatula
Common Mistakes to Avoid
- Overbaking the Brownies: This is the number one reason for dry, cakey brownies. The residual heat will continue to cook them as they cool, so it’s always better to err on the side of underbaking. Remember, you’re looking for moist crumbs on your skewer, not a clean one.
- Incorrect Oven Temperature: Every oven is different. An inexpensive oven thermometer can be a baker’s best friend, ensuring your oven is at the correct temperature. Too hot, and the edges will burn before the centre is cooked through.
- Skipping the Cooling Time: I know it’s tempting to dive straight in, but cutting brownies while they’re still warm is a recipe for a gooey mess. Allowing them to cool completely lets the chocolate and butter set, which is what creates that dense, fudgy texture and allows for clean, neat slices.
Delicious Variations to Try
Once you’ve mastered the classic recipe, it’s great fun to experiment with different flavours. Here are a few of my favourite twists:
- Salted Caramel Brownies: After pouring the batter into the tin, dollop 3-4 tablespoons of thick caramel sauce over the top. Use a knife to gently swirl it through the batter, then sprinkle with flaky sea salt before baking.
- Raspberry Chocolate Brownies: Gently press about 100g of fresh or frozen raspberries into the top of the batter before it goes into the oven. The tartness of the fruit cuts through the richness of the chocolate beautifully.
- Espresso Brownies: Add 1 tablespoon of instant espresso powder along with the cocoa powder. Coffee is a brilliant enhancer of chocolate flavour, giving the brownies an even deeper, more complex taste.
What to Serve With Chocolate Brownies
While these are magnificent on their own, a simple accompaniment can turn them into a truly special brownies dessert. Here are some ideas:
- Vanilla Bean Ice Cream: The classic pairing. The contrast of the warm, gooey brownie with cold, creamy ice cream is unbeatable.
- Crème Fraîche or Greek Yoghurt: A spoonful of tangy crème fraîche or thick Greek yoghurt provides a lovely counterpoint to the sweetness and richness of the brownie.
- A Strong Coffee: For an afternoon treat, a small cup of espresso or a strong Americano works wonderfully to balance the flavours.
Frequently Asked Questions
Brownies Recipe
Ingredients
Method
- Prepare Your Tin and Oven: Preheat your oven to 180°C (160°C fan/Gas Mark 4). Grease a 20cm (8-inch) square baking tin and line the base and sides with a single piece of baking parchment, leaving some overhang to help you lift the brownies out later.
- Melt the Chocolate and Butter: Place the cubed butter and broken dark chocolate in a heatproof bowl set over a saucepan of barely simmering water (a bain-marie). Make sure the bottom of the bowl doesn't touch the water. Stir occasionally until everything is completely melted and smooth. Remove from the heat and set aside to cool slightly for 10-15 minutes.
- Whisk the Eggs and Sugar: In a separate large bowl, using an electric hand mixer or a stand mixer with the whisk attachment, beat the eggs, caster sugar, and vanilla extract together on high speed. I find that whisking for a good 5-7 minutes is essential. The mixture should become very pale, thick, and almost double in volume. You'll know it's ready when it leaves a ribbon-like trail on the surface when you lift the whisk.
- Combine Wet Ingredients: Gently pour the slightly cooled chocolate and butter mixture into the whisked egg mixture. Using a spatula, carefully fold them together until just combined. Be gentle here to avoid knocking out all the air you just incorporated.
- Fold in the Dry Ingredients: Sift the plain flour, cocoa powder, and salt directly over the bowl. Fold everything together gently until you can no longer see any streaks of flour.
- Add Extras: If you're using them, stir through the chocolate chips or chopped nuts now.
- Bake the Brownies: Pour the batter into your prepared tin and smooth the top with your spatula. Bake on the middle shelf of the preheated oven for 25-30 minutes.
- Check for Doneness: To check if they're ready, insert a skewer or cocktail stick into the centre. It should come out with moist, sticky crumbs attached. If it comes out with wet batter, they need a few more minutes. If it comes out clean, they may be overbaked.
- Cool Completely: This is a crucial step! Leave the brownies to cool completely in the tin, first on a wire rack for 30 minutes, and then you can pop them in the fridge for an hour to firm up if you like. This ensures a clean cut and a perfectly fudgy texture. Once cool, use the parchment paper overhang to lift the slab out and cut it into 16 squares.
Notes
I truly hope you adore this brownies recipe as much as my family and I do. It’s more than just a recipe; it’s a little slice of chocolatey happiness that has been a constant in my kitchen for years. After a busy day, it’s a wonderful dessert to look forward to, perhaps after something simple and flavourful like these Sticky Sweet Teriyaki Chicken Bowls. Give it a try, and please let me know how you get on in the comments below. Happy baking!
– Elena