Best Grilled Cheese Sandwich Recipe
There’s a unique magic to a truly fantastic grilled cheese sandwich. It’s more than just bread and cheese; it’s the sound of the buttery bread crisping in the pan, the sight of that first glorious cheese pull, and the deeply satisfying flavour that transports you straight back to simpler times. For years, I thought I knew how to make one, but my results were often inconsistent – either the bread would catch before the cheese had a chance to melt, or the whole thing would end up a bit limp. I used to struggle with getting that perfect balance until I discovered a few key techniques that changed everything.
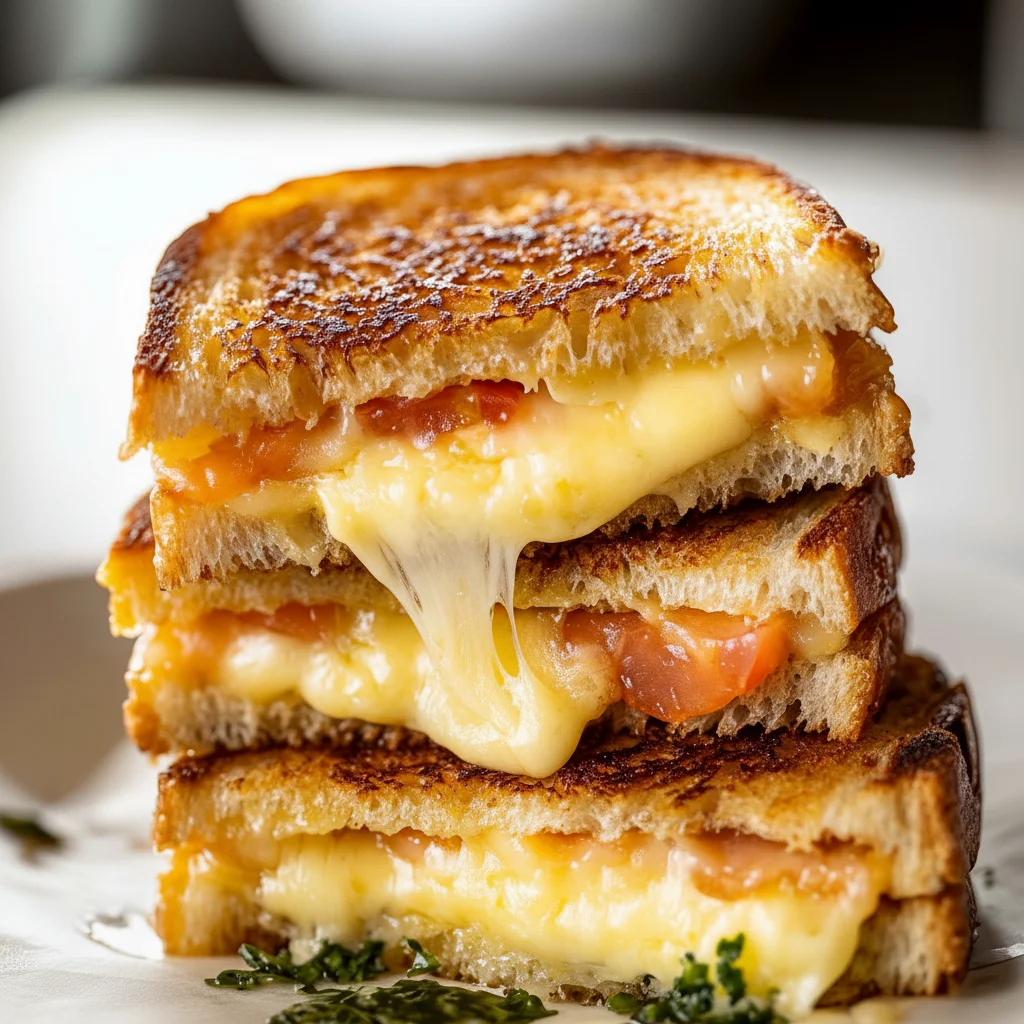
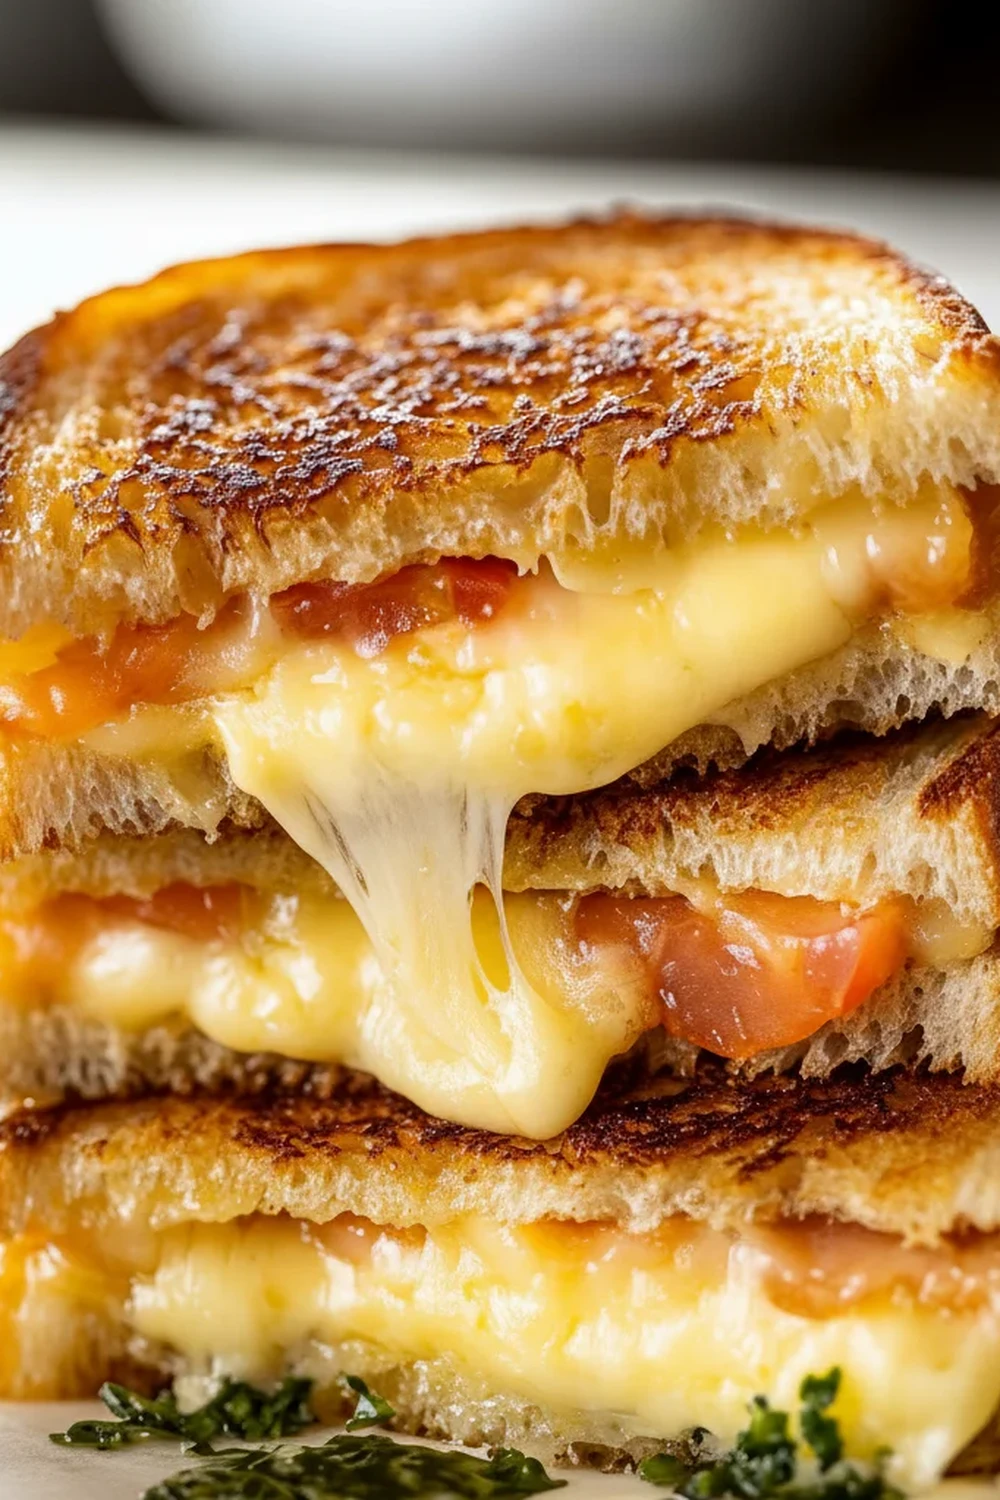
This isn’t just any cheese sandwich recipe. This is the culmination of countless attempts in my own kitchen to achieve the ultimate grilled cheese. We’re talking about bread that is shatteringly crisp and golden-brown on the outside, yet still soft within. The cheese isn’t just melted; it’s a molten, gooey river of savoury, complex flavour that stretches beautifully with every bite. The secret lies in a carefully chosen blend of cheeses and one surprising ingredient for the exterior that guarantees an unbeatable crust every single time.
This recipe works wonderfully for a speedy weekday lunch, a comforting supper served alongside a bowl of hot soup, or even as a late-night snack when only something truly satisfying will do. It’s a straightforward recipe that delivers impressive results, and once you try it, you’ll understand why this method has become a staple in my home.
Recipe Overview
This grilled cheese sandwich recipe focuses on creating the perfect textural contrast: an exceptionally crispy, golden exterior giving way to a luxuriously melted, flavourful cheese filling. By using a specific combination of cheeses, we achieve both a fantastic ‘cheese pull’ and a deep, savoury taste. I’ve tested countless cheese combinations, and this one consistently delivers the best melt and the most satisfying flavour profile.
- Prep Time: 5 minutes
- Cook Time: 8-10 minutes
- Total Time: 15 minutes
- Servings: 1 person
- Difficulty: Easy
Why You’ll Love This Grilled Cheese Sandwich Recipe
- Genuine Flavour: The combination of sharp, tangy mature Cheddar and nutty, slightly sweet Gruyère creates a cheese filling that is anything but one-dimensional. It’s rich, savoury, and deeply cheesy.
- Ready in Under 15 Minutes: From gathering your ingredients to slicing the finished sandwich, this whole process is incredibly efficient, making it ideal for a quick meal.
- Flexible Recipe: This is a brilliant foundation. You can add a layer of caramelised onions, a few rashers of crispy bacon, or even a spoonful of chutney to make it your own. It’s a great way to use up leftovers, much like in my Cheesy Tuna Melt Sandwich Recipe.
- Great for Any Occasion: It works beautifully for a simple lunch, a light dinner next to a salad, or a satisfying snack after a long day.
- Family Tested: I make this at least once a week – it’s become a family favourite. My children always ask for “the crispy cheese sandwich,” and it always gets compliments when friends pop over.
Ingredients You’ll Need
The quality of your ingredients truly shines in a simple recipe like this. I recommend using a good, sturdy loaf of bread like a sourdough or a thick-cut white farmhouse loaf. For the cheese, grating your own from a block is non-negotiable; pre-grated cheeses often contain anti-caking agents that prevent them from melting smoothly.
- 2 thick slices (about 2cm each) of sourdough or other sturdy white bread
- 50g mature Cheddar cheese, grated from a block
- 50g Gruyère cheese, grated from a block
- 1 tbsp full-fat mayonnaise (I find Hellmann’s works brilliantly here)
- 1 tbsp unsalted butter, softened to room temperature
- ¼ tsp garlic powder
- A pinch of sea salt
- A few grinds of black pepper
Elena’s Tip: Don’t be tempted to skip the Gruyère! While Cheddar provides that classic sharp taste, Gruyère is the secret to an incredible, gooey melt and adds a wonderful nutty depth that elevates the entire sandwich.
How to Make This Grilled Cheese Sandwich Recipe
The process is straightforward, but the key is patience and controlling the heat. We’re aiming for a low and slow cook to ensure the cheese melts perfectly at the same rate the bread becomes golden and crisp.
- Prepare the Cheeses: In a small bowl, combine the grated mature Cheddar and grated Gruyère. Toss them together with a pinch of black pepper until evenly mixed. This ensures you get a perfect blend of flavour in every single bite.
- Make the Garlic Butter: In another small bowl, mix the softened unsalted butter with the garlic powder and a pinch of salt until well combined.
- Assemble the Sandwich: Lay your two slices of bread on a chopping board. Spread the garlic butter evenly over one side of each slice – these will be the inside of your sandwich.
- Add the Filling: Pile the mixed cheese onto the buttered side of one slice of bread, spreading it out to the edges. Place the second slice of bread on top, buttered-side down.
- Prepare the Exterior: This is the crucial step. Using a spatula or the back of a spoon, spread the mayonnaise in a thin, even layer over the entire outer surface of both the top and bottom slices of the sandwich. I know it sounds unusual, but trust me on this!
- Cook the First Side: Place a non-stick frying pan over a low-medium heat. What works best for me is using a heavy-bottomed skillet for even heat. Carefully place the sandwich in the dry pan. Cook for 4-5 minutes, or until the bottom is a deep golden brown and beautifully crisp. Don’t be tempted to press down on it too much.
- Flip and Finish: Carefully flip the sandwich over using a wide spatula. Cook for another 3-4 minutes on the second side, until it’s equally golden and the cheese inside is completely melted and gooey. You can cover the pan with a lid for a minute to help trap the heat and encourage the cheese to melt fully.
- Rest and Serve: Slide the grilled cheese onto your chopping board and let it rest for a minute. This helps the molten cheese to set just slightly, preventing it from spilling out everywhere. Slice in half diagonally and serve immediately.
Tips From My Kitchen
- Temperature Control: The biggest mistake is using a heat that’s too high. Low and slow is the mantra here. It gives the cheese ample time to melt into a glorious, gooey pool while the bread slowly crisps to perfection without burning.
- The Secret Step: Using mayonnaise on the outside instead of butter is a game-changer. I learned that mayonnaise, being an emulsion of oil and egg, has a higher smoke point than butter. This means it helps the bread achieve a more uniform, golden-brown crust without the risk of burning. The flavour is rich and slightly tangy. You can learn more about the science behind it on sites like Serious Eats.
- Make-Ahead: You can grate the cheeses and mix the garlic butter ahead of time. Store them in separate airtight containers in the fridge for up to 2 days. This makes assembly take just a couple of minutes.
- Storage: A grilled cheese sandwich is best enjoyed fresh. However, if you have leftovers, wrap them tightly in foil and store in the fridge for up to 24 hours. Reheat in a dry frying pan over a low heat or in an oven at 180°C (160°C fan) for 5-7 minutes until warm and re-crisped.
Common Mistakes to Avoid
- Using High Heat: It’s the most common pitfall. A scorching hot pan will burn the outside of your bread long before the heat has penetrated through to the centre to melt the cheese. Start low and be patient.
- Using Pre-Grated Cheese: The starches used to coat pre-grated cheese can result in a grainy, oily texture when melted. Always take the extra minute to grate cheese from a solid block for the smoothest, gooiest results.
- Slicing Immediately: That one minute of resting time is crucial. It allows the molten cheese to calm down just enough so that when you slice into it, you get a satisfying ooze rather than a cheese landslide.
Delicious Variations to Try
While this classic combination is fantastic on its own, it also serves as a wonderful canvas for other flavours. Here are a few ideas to get you started:
- The Ploughman’s: Add a thin layer of Branston pickle or a sweet onion chutney to the inside of the sandwich before adding the cheese for a sweet and tangy kick.
- Meaty Additions: A few slices of crispy cooked bacon, a slice of high-quality ham, or some savoury prosciutto work wonderfully with the cheese. It’s a great way to make a simple sandwich into a more substantial meal, similar to how we might make Savory Beef And Broccoli Stir Fry more filling.
- Herb and Spice: Mix a pinch of smoked paprika or some finely chopped fresh chives into your cheese mixture for an extra layer of flavour. A few thin slices of fresh tomato or jalapeño also add a lovely contrast.
What to Serve With This Grilled Cheese Sandwich
A great grilled cheese can be a meal in itself, but it also pairs beautifully with a few simple accompaniments.
- Classic Tomato Soup: The ultimate pairing. The acidity of the tomato soup cuts through the richness of the cheesy sandwich, and there’s nothing better than dipping a crispy corner into the bowl.
- A Simple Green Salad: A handful of rocket or mixed greens tossed with a sharp vinaigrette provides a fresh, crisp contrast to the warm, gooey sandwich.
- A Crisp Drink: A cold, crisp apple cider or a light lager beer works very well. For a non-alcoholic option, a sharp, cloudy lemonade or a simple cup of breakfast tea is delightful.
Frequently Asked Questions
Grilled Cheese Sandwich Recipe
Ingredients
Method
- Prepare the Cheeses: In a small bowl, combine the grated mature Cheddar and grated Gruyère. Toss them together with a pinch of black pepper until evenly mixed. This ensures you get a perfect blend of flavour in every single bite.
- Make the Garlic Butter: In another small bowl, mix the softened unsalted butter with the garlic powder and a pinch of salt until well combined.
- Assemble the Sandwich: Lay your two slices of bread on a chopping board. Spread the garlic butter evenly over one side of each slice – these will be the inside of your sandwich.
- Add the Filling: Pile the mixed cheese onto the buttered side of one slice of bread, spreading it out to the edges. Place the second slice of bread on top, buttered-side down.
- Prepare the Exterior: This is the crucial step. Using a spatula or the back of a spoon, spread the mayonnaise in a thin, even layer over the entire outer surface of both the top and bottom slices of the sandwich. I know it sounds unusual, but trust me on this!
- Cook the First Side: Place a non-stick frying pan over a low-medium heat. What works best for me is using a heavy-bottomed skillet for even heat. Carefully place the sandwich in the dry pan. Cook for 4-5 minutes, or until the bottom is a deep golden brown and beautifully crisp. Don't be tempted to press down on it too much.
- Flip and Finish: Carefully flip the sandwich over using a wide spatula. Cook for another 3-4 minutes on the second side, until it's equally golden and the cheese inside is completely melted and gooey. You can cover the pan with a lid for a minute to help trap the heat and encourage the cheese to melt fully.
- Rest and Serve: Slide the grilled cheese onto your chopping board and let it rest for a minute. This helps the molten cheese to set just slightly, preventing it from spilling out everywhere. Slice in half diagonally and serve immediately.
Notes
I truly hope you give this grilled cheese sandwich recipe a go. It’s a small collection of simple techniques that combine to create something genuinely special. It proves that with a little care, the most basic of meals can become absolutely exceptional. Let me know in the comments how you get on – I’d love to hear if you try any delicious variations!
Happy cooking,
Elena