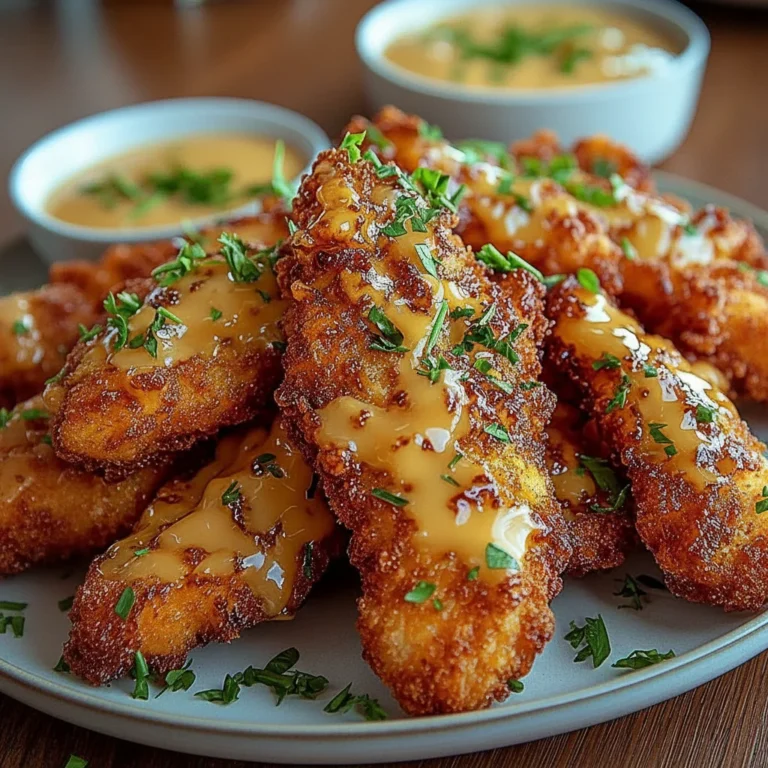
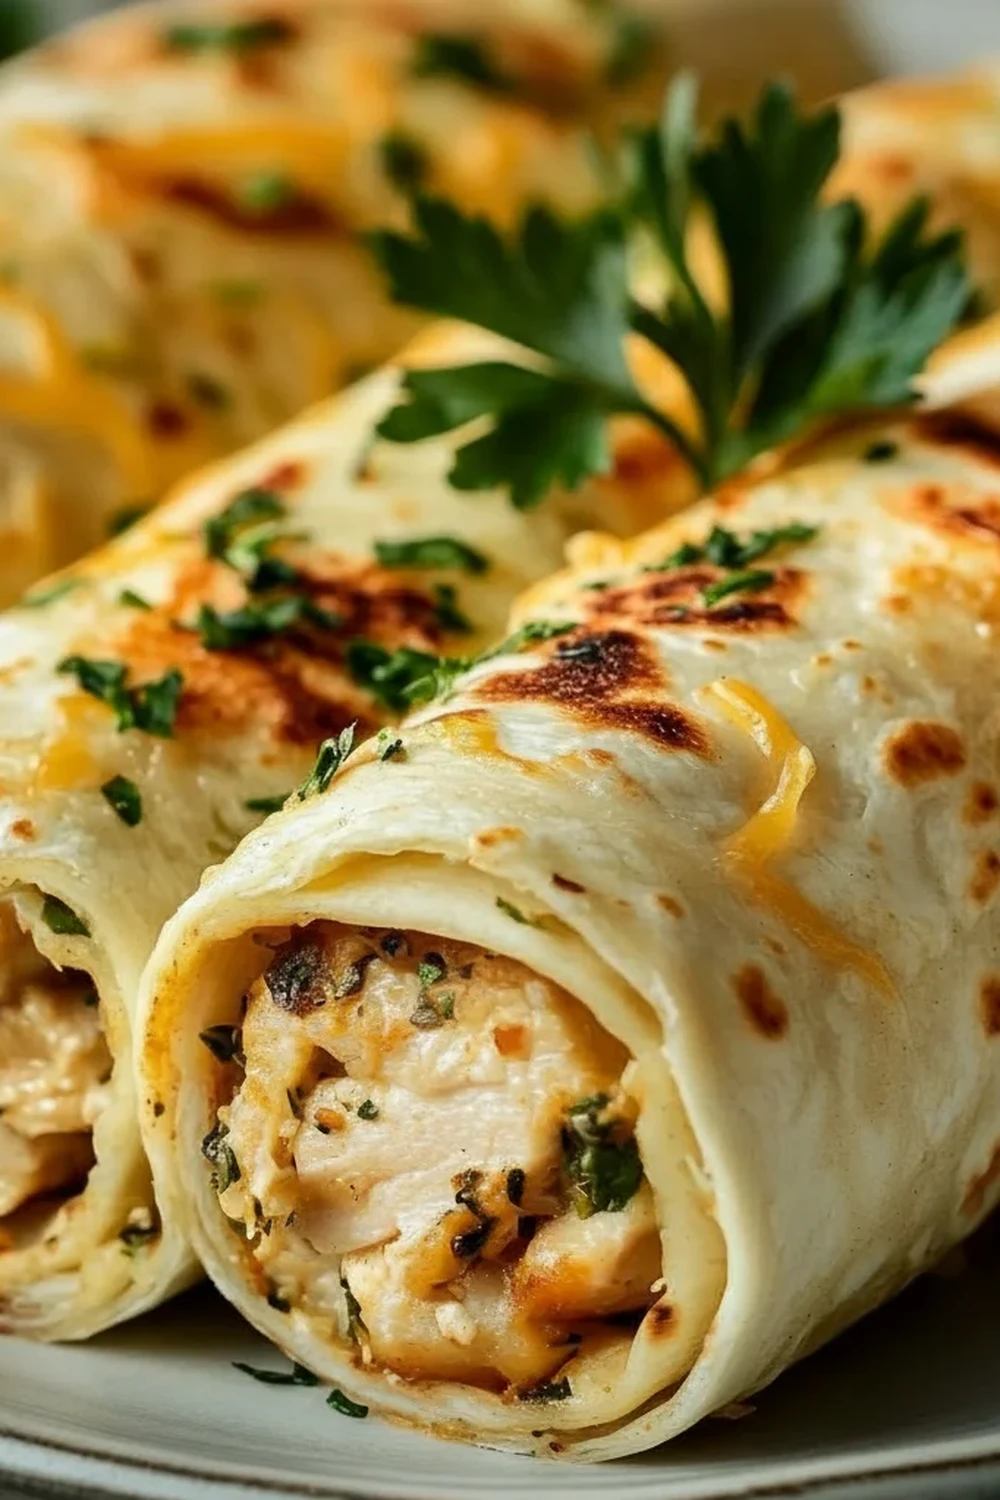
Toasted Cheesy Garlic Chicken Wraps
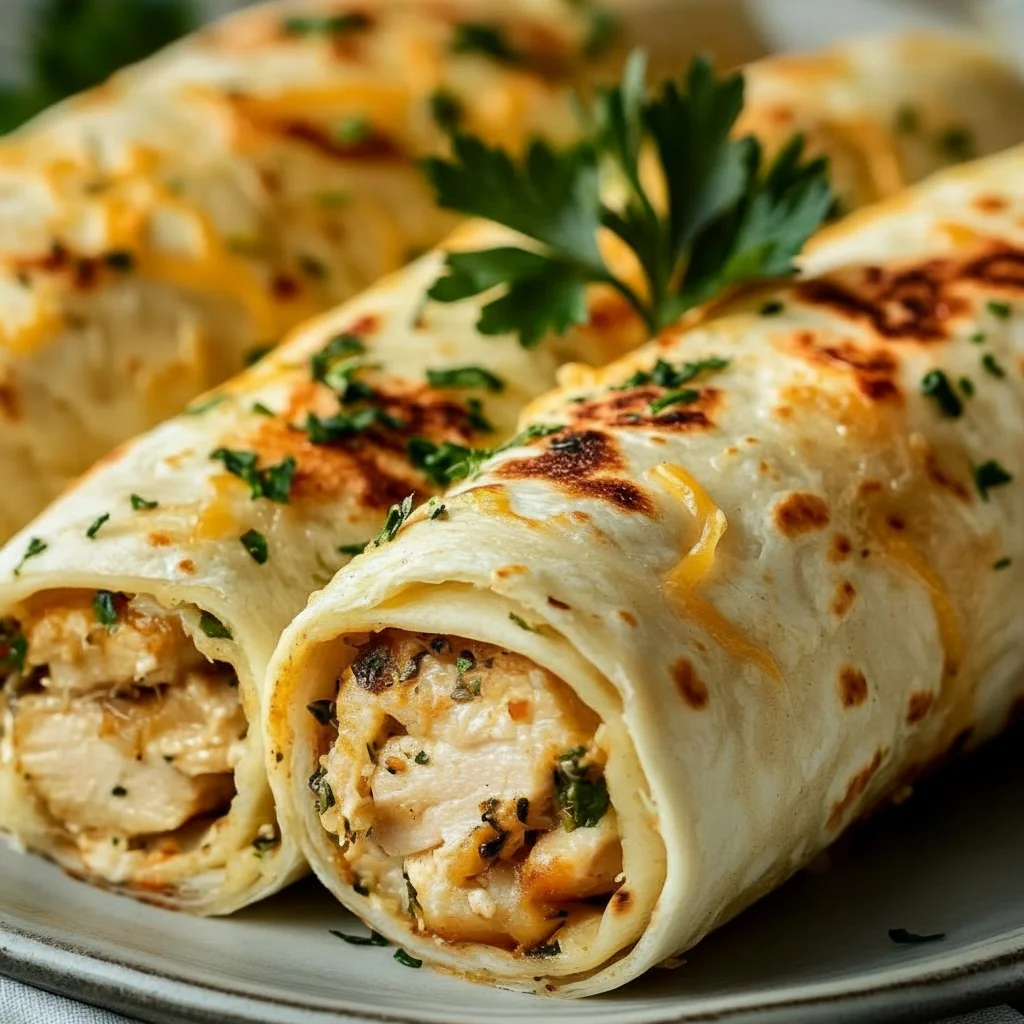
There are some meals that just hit the spot every single time, and this Cheesy Garlic Chicken Wraps recipe is firmly at the top of that list in my house. Imagine tender, juicy pieces of chicken, sautéed until golden, then tossed in a rich and fragrant garlic butter sauce. Now, picture that incredible filling tucked into a soft tortilla with heaps of gloriously melty cheddar and mozzarella cheese, then toasted until the outside is crisp and golden brown. It’s the kind of satisfying meal that makes a busy weeknight feel a little bit special.
My family asks for these wraps on a weekly basis, and I’m always happy to oblige because they come together so quickly. It’s a wonderfully adaptable recipe, a bit like my Crispy Chicken Caesar Wrap, but with a warmer, more savoury profile. This isn’t just a simple wrap; it’s a complete, handheld meal that delivers on every level – flavour, texture, and that irresistible cheese pull we all love. It’s ideal for those evenings when you need a delicious dinner on the table without a lot of fuss.
Recipe Overview
This recipe brings together succulent chicken and a punchy garlic butter sauce, all enveloped in a cheesy, toasted wrap. The process is straightforward: we cook the chicken, create a simple pan sauce, and then assemble everything for a final toast in the pan. After testing this recipe five times, I finally got the garlic sauce to the perfect consistency – it beautifully coats the chicken without making the wrap soggy. The result is a wrap that’s crisp on the outside and wonderfully gooey on the inside.
- Prep Time: 15 minutes
- Cook Time: 15 minutes
- Total Time: 30 minutes
- Servings: 4 wraps
- Difficulty: Easy
Why You’ll Love This Cheesy Garlic Chicken Wraps Recipe
- Genuine Flavour: The savoury, pan-fried chicken is coated in a rich garlic butter sauce made with real butter and fresh parsley. This is all balanced by a mix of sharp cheddar and creamy mozzarella that pulls beautifully with every single bite.
- Ready in About 30 Minutes: From dicing the chicken to serving the hot, toasty wraps, this entire meal is on the table in around half an hour, making it fantastic for weeknight cooking.
- Flexible Recipe: You can easily customise these wraps. Try swapping the cheddar for Red Leicester or add some finely diced red onion or bell peppers with the chicken for extra veg and texture.
- Great for a Casual Dinner: These wraps work beautifully for a relaxed family dinner, a weekend lunch, or even packed (once cooled) for a picnic. Everyone seems to love this one.
- Family Tested: My kids absolutely devour this every time I make it, especially the cheesy bits that get a little crispy on the edges where they ooze out in the pan. It always gets compliments.
Ingredients You’ll Need
For this recipe, we’re using simple, high-quality ingredients that you likely already have. I prefer using large flour tortillas as they are soft and pliable, making them easy to fold without tearing. When it comes to the cheese, grating your own from a block is always my top recommendation for the best melt.
- 500g skinless, boneless chicken breasts, cut into 2cm cubes
- 1 tbsp olive oil
- 1 tsp smoked paprika
- Salt and freshly ground black pepper, to taste
- 4 large flour tortillas
- 150g mature cheddar cheese, grated
- 100g mozzarella cheese, grated
- For the Garlic Butter Sauce:
- 60g unsalted butter
- 4 cloves garlic, minced
- 2 tbsp fresh parsley, finely chopped
Elena’s Tip: I find that using freshly grated cheese melts far better than the pre-shredded kind, which often contains anti-caking agents that can result in a slightly grainy texture. It only takes a minute longer and makes a huge difference to the final result.
How to Make Cheesy Garlic Chicken Wraps
The process for these wraps is simple and happens in one pan, which means less washing up! We’ll cook the chicken first, then use the same pan to make that luscious garlic butter sauce to ensure we capture all the flavour.
- Prepare the Chicken: In a medium mixing bowl, toss the cubed chicken with the olive oil, smoked paprika, a generous pinch of salt, and a few grinds of black pepper until it’s evenly coated.
- Cook the Chicken: Heat a large, non-stick frying pan over a medium-high heat. Add the seasoned chicken to the hot pan in a single layer. Cook for 6-8 minutes, turning occasionally, until the chicken is golden brown and cooked through. It’s vital to ensure chicken is cooked properly; check the guidance from the Food Standards Agency if you’re unsure. Once cooked, transfer the chicken to a clean bowl and set aside.
- Make the Garlic Butter Sauce: Reduce the heat to low-medium. Add the unsalted butter to the same pan. Once it has melted, add the minced garlic and cook for about 1 minute until fragrant, being careful not to let it burn.
- Combine Chicken and Sauce: Remove the pan from the heat. Stir the chopped fresh parsley into the garlic butter. Return the cooked chicken to the pan and toss everything together until the chicken is thoroughly coated in the sauce.
- Assemble the Wraps: Lay a tortilla flat on a clean surface. Sprinkle a quarter of the cheddar and mozzarella cheese down the centre. Top with a quarter of the garlic chicken mixture.
- Fold Securely: Fold in the two sides of the tortilla first, then tightly roll it up from the bottom to create a sealed parcel, similar to a burrito. This helps keep all that delicious filling inside. Repeat with the remaining tortillas and filling.
- Toast the Wraps: Wipe the frying pan clean with a piece of kitchen roll to remove any garlic bits that could burn. Return the pan to a medium heat. Place two wraps, seam-side down, in the pan. What works best for me is pressing the wrap down gently with a spatula to get that perfect golden-brown crust.
- Serve Immediately: Toast for 2-3 minutes per side, until the tortilla is golden and crispy, and the cheese inside is completely melted and gooey. Slice the wraps in half on the diagonal and serve immediately while they’re warm.
Tips From My Kitchen
- Temperature Control: Keep the pan on a medium heat when toasting the wraps. If the heat is too high, the tortilla will burn before the cheese has a chance to melt. Too low, and the wrap won’t get crispy.
- The Secret Step: I learned that wiping the pan clean before toasting the wraps is a crucial step. It prevents any stray, browned bits of garlic or chicken seasoning from burning and imparting a bitter taste to the outside of your lovely wrap.
- Make-Ahead: The garlic chicken filling can be made up to 2 days in advance. Store it in an airtight container in the fridge. When you’re ready to eat, simply warm the filling gently, then assemble and toast the wraps as directed.
- Storage: Leftover wraps can be stored in the fridge for up to 2 days. For the best results, reheat them in a dry frying pan over a medium heat for a few minutes on each side to restore their crispiness.
Equipment You’ll Need
- Large frying pan (non-stick is best)
- Sharp knife and cutting board
- Medium mixing bowl
- Cheese grater
- Spatula or wooden spoon
Common Mistakes to Avoid
- Overcrowding the pan: When cooking the chicken, make sure it’s in a single layer. If you overcrowd the pan, the chicken will steam instead of browning, and you’ll miss out on that lovely caramelised flavour. Cook in two batches if necessary.
- Burning the garlic: Garlic cooks very quickly and turns bitter when burnt. Keep the heat on low-medium when making the sauce and stir continuously for the minute it’s in the pan before adding the parsley and chicken.
- Skipping the toasting: While the filling is delicious on its own, toasting the assembled wrap is what takes this meal to the next level. It melts the cheese into a gooey blanket and gives the tortilla a satisfying crunch.
Delicious Variations to Try
One of the best things about this recipe is how easily you can adapt it. Here are a few of my favourite ways to change things up:
- Spicy Garlic Chicken Wraps: Add 1/2 teaspoon of chilli flakes to the garlic butter sauce, or mix in some chopped pickled jalapeños with the cheese for a spicy kick.
- Vegetarian Option: This recipe works wonderfully with halloumi. Cube the halloumi and pan-fry until golden on all sides before tossing it in the garlic butter sauce. You could also use a can of chickpeas, drained and patted dry.
- Different Protein: Try this with thin strips of steak or even leftover shredded chicken from a Sunday roast. If you enjoy grilled chicken, my Smoky Grilled Chicken Skewers Recipe would also provide a fantastic base for the filling.
What to Serve With Cheesy Garlic Chicken Wraps
These wraps are quite substantial on their own, but if you want to turn them into a larger meal, here are a few ideas that work beautifully:
- A Crisp Green Salad: A simple salad with a light vinaigrette dressing cuts through the richness of the cheese and garlic butter perfectly.
- Sweet Potato Fries: The sweetness of the fries provides a lovely contrast to the savoury chicken.
- A Cold Drink: A crisp lager or a chilled glass of Sauvignon Blanc pairs wonderfully with the garlic and cheese. For a non-alcoholic option, a sharp, cloudy lemonade is very refreshing.
Frequently Asked Questions
Cheesy Garlic Chicken Wraps
Ingredients
Method
- Prepare the Chicken: In a medium mixing bowl, toss the cubed chicken with the olive oil, smoked paprika, a generous pinch of salt, and a few grinds of black pepper until it's evenly coated.
- Cook the Chicken: Heat a large, non-stick frying pan over a medium-high heat. Add the seasoned chicken to the hot pan in a single layer. Cook for 6-8 minutes, turning occasionally, until the chicken is golden brown and cooked through. It’s vital to ensure chicken is cooked properly; check the guidance from the Food Standards Agency if you're unsure. Once cooked, transfer the chicken to a clean bowl and set aside.
- Make the Garlic Butter Sauce: Reduce the heat to low-medium. Add the unsalted butter to the same pan. Once it has melted, add the minced garlic and cook for about 1 minute until fragrant, being careful not to let it burn.
- Combine Chicken and Sauce: Remove the pan from the heat. Stir the chopped fresh parsley into the garlic butter. Return the cooked chicken to the pan and toss everything together until the chicken is thoroughly coated in the sauce.
- Assemble the Wraps: Lay a tortilla flat on a clean surface. Sprinkle a quarter of the cheddar and mozzarella cheese down the centre. Top with a quarter of the garlic chicken mixture.
- Fold Securely: Fold in the two sides of the tortilla first, then tightly roll it up from the bottom to create a sealed parcel, similar to a burrito. This helps keep all that delicious filling inside. Repeat with the remaining tortillas and filling.
- Toast the Wraps: Wipe the frying pan clean with a piece of kitchen roll to remove any garlic bits that could burn. Return the pan to a medium heat. Place two wraps, seam-side down, in the pan. What works best for me is pressing the wrap down gently with a spatula to get that perfect golden-brown crust.
- Serve Immediately: Toast for 2-3 minutes per side, until the tortilla is golden and crispy, and the cheese inside is completely melted and gooey. Slice the wraps in half on the diagonal and serve immediately while they're warm.
Notes
I really hope you give this Cheesy Garlic Chicken Wraps recipe a go. It has become a true staple in our home for its incredible flavour and how straightforward it is to make. It’s one of those recipes that always leaves everyone feeling happy and satisfied. If you do try it, please let me know what you think in the comments below – I love hearing about your kitchen adventures!
Happy cooking,
Elena