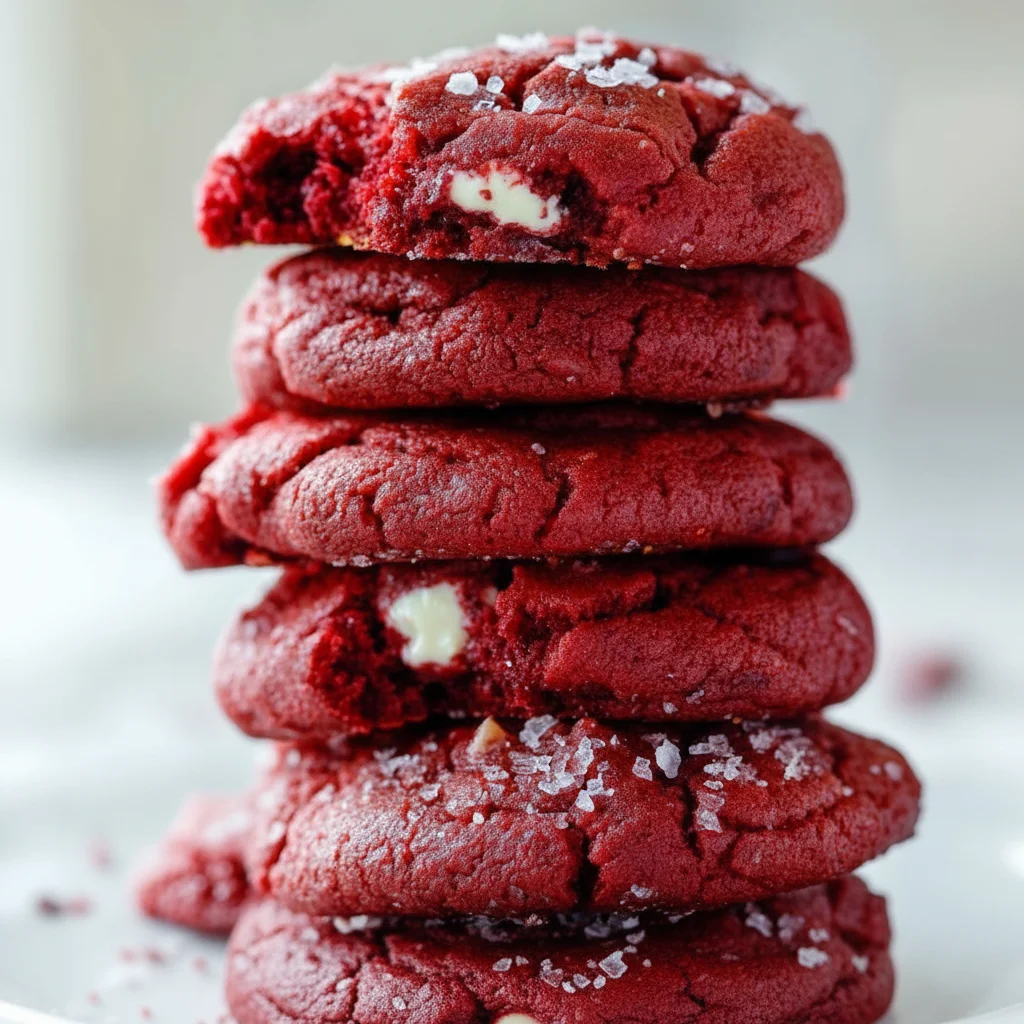
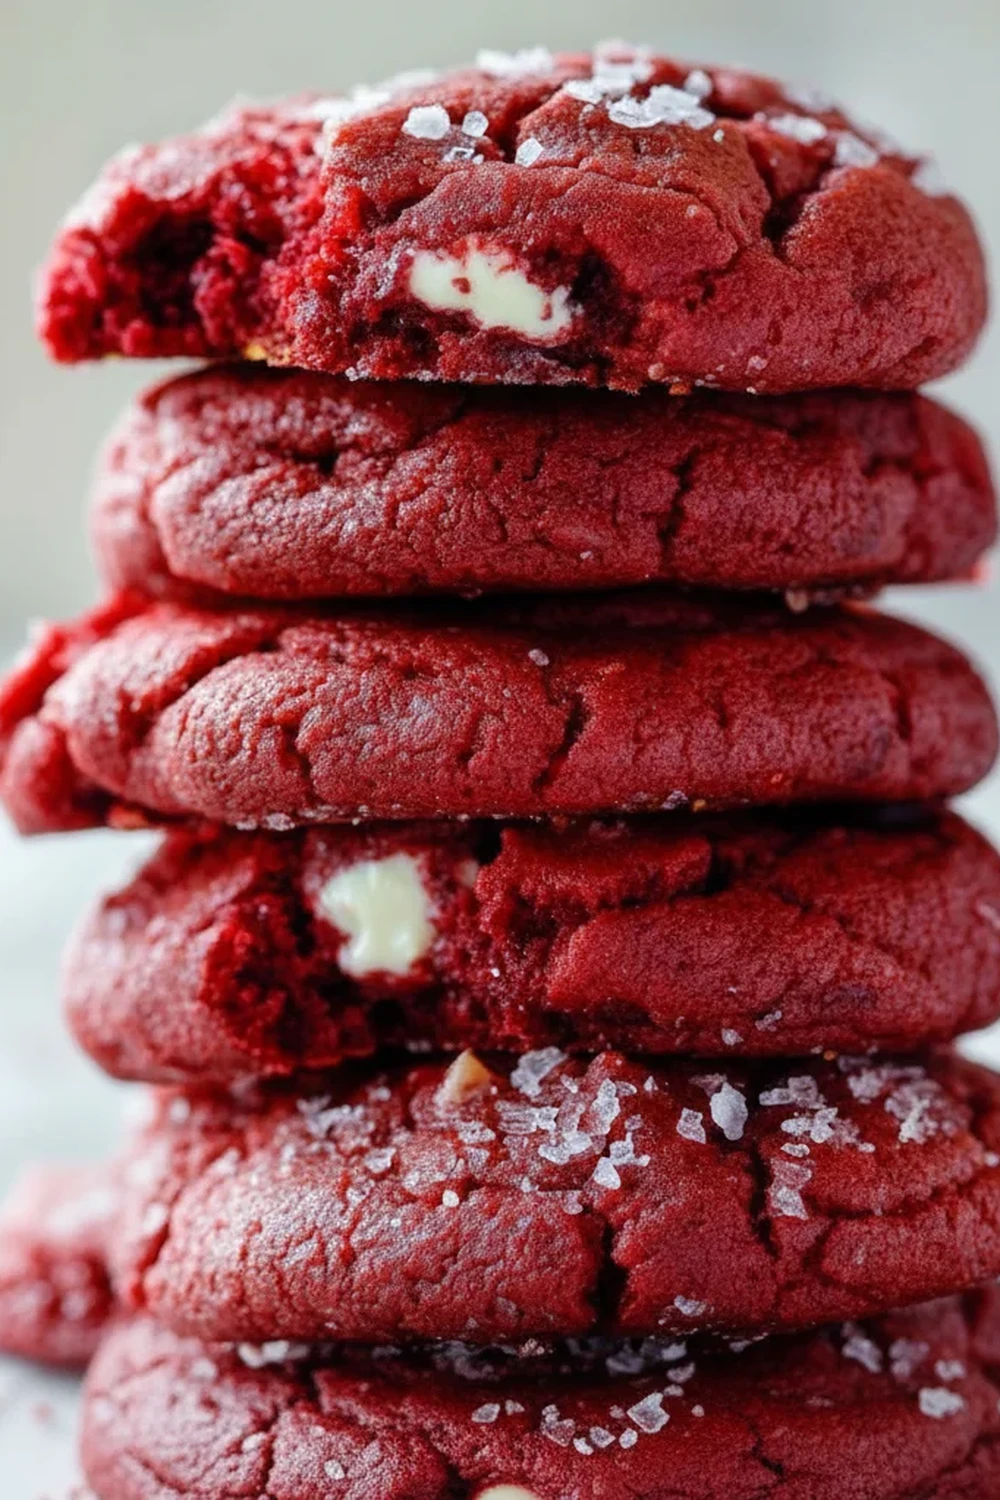
Red Velvet Gooey Butter Cookies
There’s something truly special about a cookie that delivers more than you expect. When I first set out to create the ultimate red velvet cookie, I knew it had to be more than just a red-coloured biscuit. It needed to capture the soul of its namesake cake – the soft texture, the hint of cocoa, and that delightful tang of cream cheese. These Red Velvet Gooey Butter Cookies are the result of that quest. Friends always ask me for this recipe after trying it at dinner parties, and I’m so excited to finally share it with you all.
What sets these apart is the “gooey butter” element, inspired by the famous St. Louis cake. We create a soft, vibrant red velvet cookie dough that encases a small, hidden ball of sweet cream cheese filling. As it bakes, the filling softens and melds with the cookie, creating an unbelievably tender, moist, and gooey centre that is simply divine. The outside has a slight crispness from a roll in icing sugar, which cracks beautifully in the oven, giving them their signature crinkle look.
These Red Velvet Gooey Butter Cookies are ideal when you want a bake that feels a little bit fancy but is straightforward to make. They work wonderfully for holiday gatherings, Valentine’s treats, or simply to brighten up a dreary afternoon with a cup of tea. If you’re a fan of red velvet cake, I promise you will adore this cookie version.
Recipe Overview
This recipe brings the classic flavours of a Red Velvet cake into a delightful, hand-held treat. Expect a soft, chewy cookie with a rich, deep red hue, a subtle chocolate flavour, and a surprise tangy, sweet cream cheese centre. During testing, I found that chilling the dough for at least an hour is non-negotiable; it prevents the cookies from spreading too much and ensures the gooey centre stays contained.
- Prep Time: 25 minutes
- Chill Time: 1 hour
- Cook Time: 12 minutes
- Total Time: 1 hour 37 minutes
- Servings: Makes 24 cookies
- Difficulty: Easy
Why You’ll Love These Red Velvet Gooey Butter Cookies
- Authentic Red Velvet Flavour: We use a careful balance of cocoa powder, vanilla, and a touch of vinegar to replicate that distinctive red velvet taste. The cream cheese filling is the finishing touch that makes them truly authentic.
- Ready in About 40 Minutes (plus chilling): The active prep and bake time is quite short, making these a great option for an afternoon baking session.
- A Visually Stunning Treat: The deep crimson colour contrasted with the white, crackled icing sugar topping makes these butter cookies incredibly eye-catching on any dessert platter.
- Works Brilliantly for Gifting: Pack them in a nice box or tin, and they make a thoughtful, homemade gift for birthdays, Christmas, or just to say thank you. They always get compliments.
- Family Tested: My whole family adores these, but my son claims they are the best cookies I’ve ever made. The surprise gooey centre is always a massive hit with the little ones!
Ingredients You’ll Need
For the best results, use full-fat cream cheese and good-quality cocoa powder. I often use Dr. Oetker Fine Dark Cocoa Powder for a lovely rich flavour that isn’t too overpowering. Ensure your butter and cream cheese are at room temperature for a smooth, lump-free mixture.
- For the Cream Cheese Filling:
- 115g full-fat cream cheese, softened
- 60g icing sugar, sifted
- ½ tsp vanilla extract
- For the Red Velvet Cookie Dough:
- 115g unsalted butter, softened
- 150g caster sugar
- 1 large egg, room temperature
- 1 tbsp whole milk
- 1 tsp vanilla extract
- 1 tsp white vinegar
- 2-3 tsp red food colouring gel (not liquid)
- 190g plain flour
- 20g unsweetened cocoa powder
- ½ tsp bicarbonate of soda
- ¼ tsp salt
- For Rolling:
- 50g icing sugar
Elena’s Tip: Use gel food colouring! Liquid food colouring can alter the consistency of the dough, making it too wet. A good quality gel, like Sugarflair or ProGel, will give you that vibrant red without affecting the texture.
How to Make Red Velvet Gooey Butter Cookies
The process is broken down into three simple stages: making the filling, making the dough, and then assembling the cookies. Don’t be tempted to skip the chilling time – it’s crucial for the perfect texture and appearance.
- Prepare the Cream Cheese Filling: In a small bowl, beat the softened cream cheese, 60g of sifted icing sugar, and ½ tsp of vanilla extract with an electric mixer until smooth and combined. Cover and place in the freezer for at least 30 minutes to firm up. This makes it much easier to handle.
- Cream Butter and Sugar: In a large bowl or the bowl of a stand mixer, beat the softened butter and caster sugar together on medium speed for about 2-3 minutes, until the mixture is light and fluffy.
- Add Wet Ingredients: Add the egg, milk, 1 tsp vanilla extract, and white vinegar. Mix until just combined. Now, add your red food colouring gel and mix again until the colour is evenly distributed throughout the mixture.
- Combine Dry Ingredients: In a separate bowl, whisk together the plain flour, cocoa powder, bicarbonate of soda, and salt.
- Make the Dough: Gradually add the dry ingredients to the wet ingredients, mixing on a low speed until a soft dough forms. Be careful not to overmix. Cover the bowl with cling film and chill in the refrigerator for at least 1 hour.
- Assemble the Cookies: Preheat your oven to 180°C (160°C fan) and line two large baking trays with parchment paper. Place the 50g of icing sugar for rolling in a small, shallow bowl.
- Shape and Fill: Remove the filling and dough from the fridge/freezer. Take a tablespoon-sized piece of cookie dough and flatten it in your palm. Scoop a small teaspoon of the chilled cream cheese filling and place it in the centre. Carefully wrap the cookie dough around the filling, rolling it into a smooth ball. I find that using a small ice cream scoop gives you perfectly uniform cookies every time.
- Coat and Bake: Roll each dough ball generously in the icing sugar until it’s completely coated. Place the balls on the prepared baking trays, leaving about 5cm (2 inches) of space between each one to allow for spreading.
- Bake to Perfection: Bake for 10-12 minutes. The cookies should look set around the edges and have lovely cracks on top, but still be very soft in the centre. They will firm up as they cool. Let them cool on the baking tray for 5 minutes before transferring them to a wire rack to cool completely.
Tips From My Kitchen
- Mind the Temperature: Room temperature ingredients are key for the dough. Cold butter or eggs won’t cream together properly, which can affect the final texture of your gooey cookies.
- The Secret to Gooeyness: I used to struggle with getting that perfectly gooey centre until I learned that slightly underbaking is the key. Pull them from the oven when the centre still looks a little soft. They will continue to cook on the hot tray, resulting in that dream-like, tender middle.
- Make-Ahead Magic: You can make the cookie dough up to 3 days in advance and keep it well-wrapped in the fridge. You can also freeze the unbaked, filled dough balls for up to 3 months. Just bake from frozen, adding an extra 2-3 minutes to the cooking time.
- Storing Your Cookies: Store the baked cookies in an airtight container at room temperature for up to 3 days. Because of the cream cheese filling, I prefer to store them in the refrigerator, where they’ll last for up to a week. Let them come to room temperature before serving for the best texture.
–
–
Equipment You’ll Need
- Stand mixer or a hand mixer with a large bowl
- Two large baking trays
- Parchment paper
- Wire cooling rack
- Small ice cream scoop (optional, but recommended)
Common Mistakes to Avoid
- Overcrowding the Baking Tray: These cookies need space to spread. Placing them too close together means they’ll merge into one giant cookie and won’t bake evenly. Aim for no more than 12 on a standard tray.
- Using a Hot Oven: An oven that’s too hot will cause the outside to burn before the inside and the gooey cream cheese centre have had a chance to bake properly. An oven thermometer is a great investment to ensure accuracy. For this recipe, stick to 180°C (160°C fan).
- Skipping the Chill Time: I can’t stress this enough! Chilling solidifies the fat in the dough, which controls spreading. It also allows the flavours to meld together. A chilled dough results in a thicker, chewier cookie with a more pronounced flavour.
Delicious Variations to Try
While these Red Velvet Butter Cookies are fantastic as they are, you can easily adapt them to your taste. Here are a few ideas we’ve enjoyed:
- White Chocolate Chip Red Velvet: Fold 100g of white chocolate chips into the cookie dough at the final stage for pockets of creamy, sweet chocolate.
- A Nutty Twist: Add 50g of finely chopped pecans or walnuts to the dough for a delightful textural contrast.
- Espresso-Infused: Add 1 teaspoon of instant espresso powder along with the cocoa powder. It won’t make the cookies taste of coffee, but it will beautifully deepen and enhance the chocolate flavour notes.
What to Serve With These Red Velvet Gooey Butter Cookies
These cookies are a wonderful standalone treat, but they also pair beautifully with a few simple accompaniments.
- A Glass of Cold Milk: The classic cookie pairing for a reason! The creaminess of the milk cuts through the sweetness perfectly.
- A Hot Beverage: Enjoy with a freshly brewed coffee or a simple black tea. The warmth is a lovely contrast to the gooey cookie.
- As Part of a Dessert Board: Arrange these vibrant cookies on a platter with fresh berries, other biscuits like shortbread, and some dark chocolate squares for an impressive but low-effort dessert. It’s the perfect sweet course after a flavourful meal like my Sticky Sweet Teriyaki Chicken Bowls.
Frequently Asked Questions
Red Velvet Gooey Butter Cookies
Ingredients
Method
- Prepare the Cream Cheese Filling: In a small bowl, beat the softened cream cheese, 60g of sifted icing sugar, and ½ tsp of vanilla extract with an electric mixer until smooth and combined. Cover and place in the freezer for at least 30 minutes to firm up. This makes it much easier to handle.
- Cream Butter and Sugar: In a large bowl or the bowl of a stand mixer, beat the softened butter and caster sugar together on medium speed for about 2-3 minutes, until the mixture is light and fluffy.
- Add Wet Ingredients: Add the egg, milk, 1 tsp vanilla extract, and white vinegar. Mix until just combined. Now, add your red food colouring gel and mix again until the colour is evenly distributed throughout the mixture.
- Combine Dry Ingredients: In a separate bowl, whisk together the plain flour, cocoa powder, bicarbonate of soda, and salt.
- Make the Dough: Gradually add the dry ingredients to the wet ingredients, mixing on a low speed until a soft dough forms. Be careful not to overmix. Cover the bowl with cling film and chill in the refrigerator for at least 1 hour.
- Assemble the Cookies: Preheat your oven to 180°C (160°C fan) and line two large baking trays with parchment paper. Place the 50g of icing sugar for rolling in a small, shallow bowl.
- Shape and Fill: Remove the filling and dough from the fridge/freezer. Take a tablespoon-sized piece of cookie dough and flatten it in your palm. Scoop a small teaspoon of the chilled cream cheese filling and place it in the centre. Carefully wrap the cookie dough around the filling, rolling it into a smooth ball. I find that using a small ice cream scoop gives you perfectly uniform cookies every time.
- Coat and Bake: Roll each dough ball generously in the icing sugar until it's completely coated. Place the balls on the prepared baking trays, leaving about 5cm (2 inches) of space between each one to allow for spreading.
- Bake to Perfection: Bake for 10-12 minutes. The cookies should look set around the edges and have lovely cracks on top, but still be very soft in the centre. They will firm up as they cool. Let them cool on the baking tray for 5 minutes before transferring them to a wire rack to cool completely.
Notes
I truly hope you enjoy baking – and eating! – these Red Velvet Gooey Butter Cookies. They are a real joy to make and even more of a joy to share. The moment someone bites into one and discovers that soft, creamy centre is always so rewarding. If you try this recipe, please leave a comment below and let me know how they turned out for you. Happy baking!