Homemade Sushi Rolls Recipe Guide
There’s something uniquely satisfying about creating your own sushi at home. It feels like a special occasion, a real culinary achievement. For years, I was too intimidated to try, thinking it was a craft best left to highly trained chefs. I imagined sticky rice disasters and rolls that fell apart the moment I looked at them. Then, I finally took the plunge, and after a few messy attempts, I developed this reliable sushi rolls recipe that has completely changed my perspective. My husband, who’s usually picky about his sushi, asked for seconds the first time I made these, and now it’s a regular request for our Friday nights in.
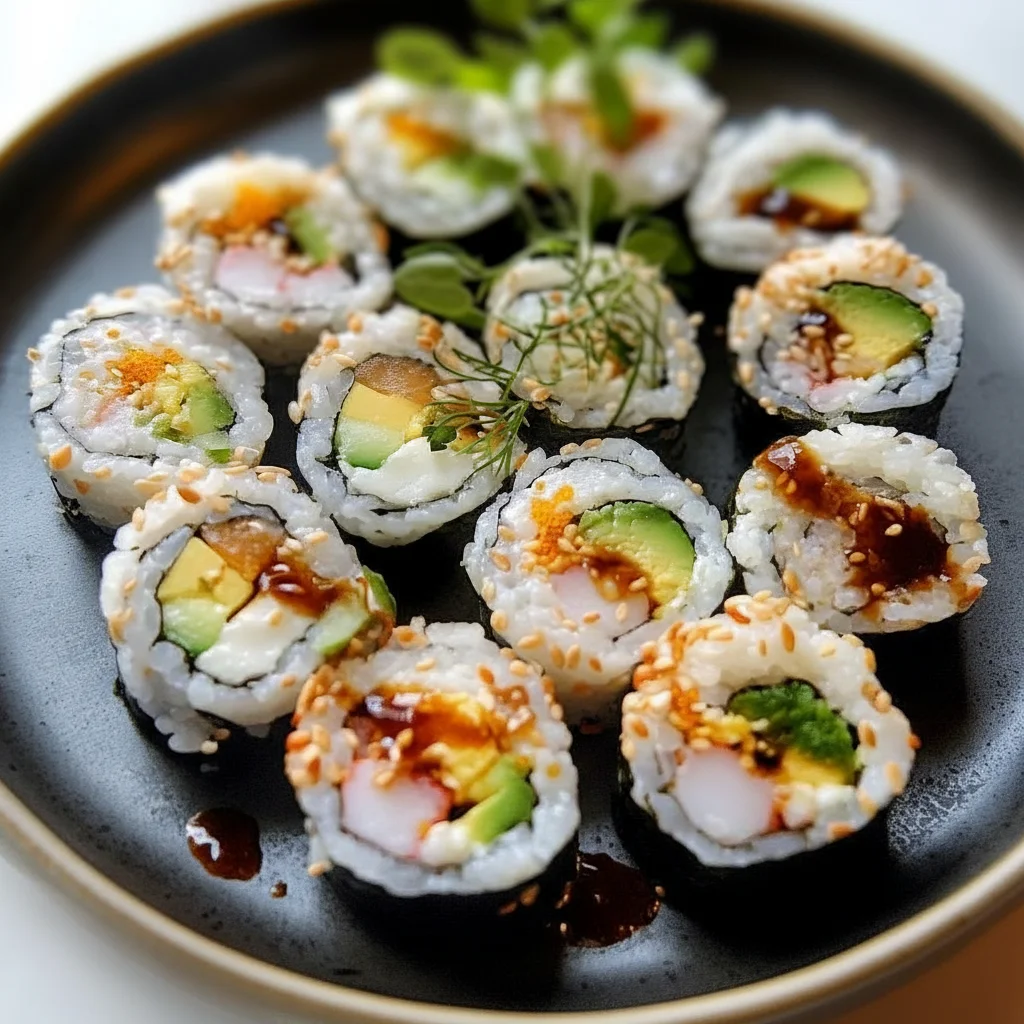
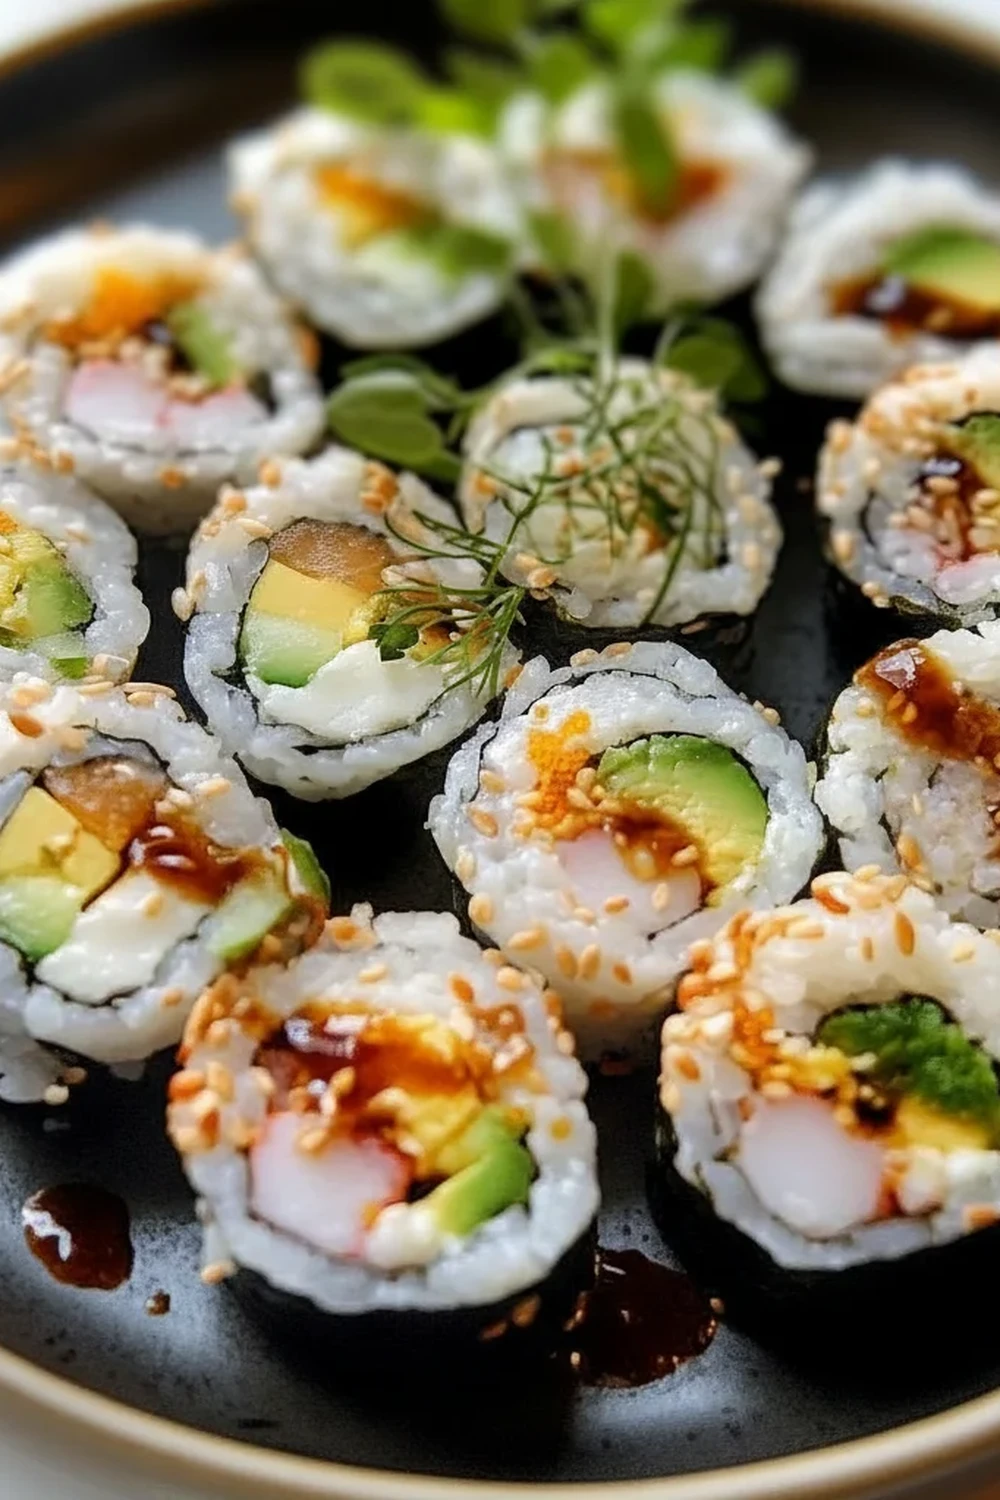
This recipe is all about getting the fundamentals right, especially the sushi rice. Once you master that, the world of sushi rolls opens up to you. We’ll be making classic maki rolls, which are those lovely seaweed-on-the-outside rolls, filled with fresh salmon, creamy avocado, and crisp cucumber. The combination of the gently vinegared, perfectly cooked rice, the rich fish, and the fresh vegetables wrapped in a sheet of savoury nori is just wonderful. It’s a hands-on process that is genuinely fun, especially if you get a friend or partner involved.
This sushi recipe is ideal when you want to make a weekend lunch feel a bit more special or create a light, elegant dinner. It works beautifully for a date night at home or even as an appetiser when you have friends over. Everyone seems to love building their own rolls, so it becomes an interactive and memorable meal.
Recipe Overview
This sushi rolls recipe guides you through making authentic-tasting maki rolls from scratch. The main focus is on achieving perfectly seasoned and textured sushi rice, which is the foundation of great sushi. The flavour profile is a beautiful balance of savoury nori, tangy rice, rich, fresh fish, and crisp, clean-tasting vegetables. After some trial and error, I found that letting the cooked rice cool to just above room temperature is the key to rolls that are easy to handle and don’t fall apart.
- Prep Time: 30 minutes
- Cook Time: 20 minutes
- Total Time: 50 minutes (plus 30 minutes cooling time for rice)
- Servings: 2-3 people (makes 4-5 rolls)
- Difficulty: Medium
Why You’ll Love This Sushi Rolls Recipe
- Genuine Flavour: The homemade seasoned vinegar gives the rice that authentic, slightly sweet and tangy taste you find in your favourite Japanese restaurants. It’s so much better than store-bought sushi.
- A Fun Culinary Project: Making sushi is an engaging activity that takes around an hour. It’s a fantastic way to spend an evening, getting hands-on with your food.
- Flexible Recipe: You can swap the fillings easily. Don’t like salmon? Try sushi-grade tuna, cooked prawns, or even one of our Classic Shrimp Scampi leftovers. For a vegetarian option, use shiitake mushrooms, bell peppers, and carrots.
- Great for Special Occasions: This works wonderfully for a home date night, a sophisticated starter for a dinner party, or a fun weekend family activity.
- Family Tested: This recipe always gets compliments in my house. It’s a brilliant way to introduce different textures and flavours, and my kids have a great time choosing their own fillings.
Ingredients You’ll Need
The quality of your ingredients, especially the rice and fish, will make a huge difference. I always use a proper Japanese short-grain rice like Koshihikari for its texture and ability to hold its shape. For the fish, it’s absolutely crucial to use ‘sushi-grade’ or ‘sashimi-grade’ fish from a trusted fishmonger who can confirm it’s safe to be eaten raw.
- For the Sushi Rice:
- 300g Japanese short-grain sushi rice
- 350ml cold water
- 60ml rice vinegar
- 2 tablespoons caster sugar
- 1 teaspoon salt
- For the Rolls:
- 4-5 sheets of nori (seaweed)
- 200g sushi-grade salmon fillet, skin and bones removed
- 1 large ripe avocado
- ½ a cucumber
- For Serving (Optional):
- Soy sauce (preferably Japanese shoyu)
- Wasabi paste
- Pickled ginger (gari)
- Toasted sesame seeds
Elena’s Tip: Don’t be tempted to use any other type of vinegar. Rice vinegar has a mild, sweet profile that is essential for authentic sushi rice. White wine or cider vinegar will be far too harsh and will overpower the delicate flavours.
How to Make Sushi Rolls
The process can be broken down into three main parts: preparing the rice, preparing the fillings, and rolling. We’ll take it one step at a time. Make sure you have a bamboo sushi mat (makisu) ready; it really helps in getting a nice, tight roll.
- Rinse and Cook the Rice: Place the rice in a bowl and cover with cold water. Swirl the rice with your hand, then drain. Repeat this process 4-5 times until the water runs almost clear. Drain the rice thoroughly and place it in a medium saucepan with the 350ml of cold water. Bring to a boil, then immediately reduce the heat to the lowest setting, cover with a tight-fitting lid, and simmer for 15 minutes. Do not lift the lid. After 15 minutes, remove from the heat and let it stand, still covered, for another 10 minutes.
- Prepare the Seasoning: While the rice is cooking, gently heat the rice vinegar, sugar, and salt in a small pan over low heat. Stir until the sugar and salt have completely dissolved. Do not let it boil. Set this aside to cool slightly.
- Season the Rice: Transfer the hot cooked rice to a large, non-metallic bowl (a wooden or glass one is ideal). Pour the vinegar mixture evenly over the rice. Using a rice paddle or wooden spoon, gently ‘cut’ and fold the seasoning through the rice. I find that fanning the rice with a magazine or piece of card as you do this helps it cool down faster and gives it a lovely gloss. Let the rice cool to room temperature, which can take about 30 minutes.
- Prepare the Fillings: While the rice cools, prepare your fillings. Slice the sushi-grade salmon into long strips about 1cm thick. Peel the avocado, remove the stone, and slice it into thin strips. Cut the cucumber into long, thin batons (julienne).
- Assemble the Roll: Place your bamboo mat on a clean work surface. Lay one sheet of nori on top, shiny-side down. Have a small bowl of water nearby (Tezu). Dip your fingers in the water to prevent the rice from sticking to them. Take a handful of rice (about 1/4 of the total) and spread it evenly over the nori, leaving a 2cm border at the top edge. Be gentle and don’t press down too hard.
- Add the Fillings: Arrange a line of your fillings (a few strips of salmon, avocado, and cucumber) horizontally across the centre of the rice. What works best for me is not to overfill the roll, as this makes it very difficult to close. Less is more!
- Roll the Sushi: Using the edge of the bamboo mat closest to you, lift it and start to roll it over the fillings, tucking the edge of the nori into the roll to secure them. Keep a firm, even pressure as you continue to roll away from you until the entire roll is formed. Squeeze the mat gently around the roll to compact it and ensure it’s a tight cylinder.
- Slice and Serve: Use a very sharp, slightly wet knife to slice the roll. First, trim the uneven ends, then slice the log into 6-8 equal pieces. Wipe the knife with a damp cloth between each cut for the cleanest slices. Serve immediately with soy sauce, wasabi, and pickled ginger.
Tips From My Kitchen
- Rice Temperature is Key: Don’t try to roll sushi with hot rice. It will make the nori soft and tear easily. It also shouldn’t be fridge-cold, as it becomes hard. The ideal temperature is slightly warm or room temperature, which keeps it pliable.
- The Secret to Clean Cuts: I learned that a long, sharp knife is non-negotiable for slicing. A serrated knife will just tear the nori. Dip the tip of your knife in water before each slice, letting a drop run down the blade. This prevents the rice from sticking and gives you those perfect, professional-looking pieces.
- Make-Ahead: You can cook and season the rice a few hours ahead. Keep it covered with a damp cloth at room temperature (do not refrigerate). You can also prep all your vegetables and fish, storing them in airtight containers in the fridge until you’re ready to assemble.
- Storage: Sushi is best eaten fresh, on the day it is made. If you have leftovers, wrap them tightly in cling film and store them in the fridge for up to 24 hours. The rice will harden, but it will still be enjoyable.
Common Mistakes to Avoid
- Using the Wrong Rice: Do not substitute sushi rice with long-grain rice like basmati or jasmine. They don’t have the high starch content needed to become sticky and hold the roll together. It must be Japanese short-grain rice.
- Overcooking the Rice: Mushy rice is the enemy of good sushi. Follow the cooking times precisely and, most importantly, do not lift the lid while it simmers and steams. This is crucial for achieving the right texture. The rice should be tender but with a slight bite.
- Pressing Too Hard: When spreading the rice on the nori or rolling the sushi, be firm but gentle. Compacting the rice too much will result in a dense, gummy texture rather than light, distinct grains.
What to Serve With Sushi Rolls
To turn your sushi rolls into a full meal, a few simple Japanese-inspired sides work beautifully. The goal is to complement the clean, fresh flavours of the sushi, not overpower them.
- Miso Soup: A small bowl of warm, savoury miso soup is a classic starter that prepares the palate.
- Steamed Edamame: A bowl of lightly salted edamame beans is a simple, healthy, and satisfying side.
- Japanese Beer or Sake: A crisp, light Japanese lager like Asahi or Sapporo cuts through the richness of the fish. Alternatively, a dry sake served chilled is a more traditional and elegant pairing. For a non-alcoholic option, cold green tea is perfect.
Frequently Asked Questions
Sushi Rolls Recipe
Ingredients
Method
- Rinse and Cook the Rice: Place the rice in a bowl and cover with cold water. Swirl the rice with your hand, then drain. Repeat this process 4-5 times until the water runs almost clear. Drain the rice thoroughly and place it in a medium saucepan with the 350ml of cold water. Bring to a boil, then immediately reduce the heat to the lowest setting, cover with a tight-fitting lid, and simmer for 15 minutes. Do not lift the lid. After 15 minutes, remove from the heat and let it stand, still covered, for another 10 minutes.
- Prepare the Seasoning: While the rice is cooking, gently heat the rice vinegar, sugar, and salt in a small pan over low heat. Stir until the sugar and salt have completely dissolved. Do not let it boil. Set this aside to cool slightly.
- Season the Rice: Transfer the hot cooked rice to a large, non-metallic bowl (a wooden or glass one is ideal). Pour the vinegar mixture evenly over the rice. Using a rice paddle or wooden spoon, gently 'cut' and fold the seasoning through the rice. I find that fanning the rice with a magazine or piece of card as you do this helps it cool down faster and gives it a lovely gloss. Let the rice cool to room temperature, which can take about 30 minutes.
- Prepare the Fillings: While the rice cools, prepare your fillings. Slice the sushi-grade salmon into long strips about 1cm thick. Peel the avocado, remove the stone, and slice it into thin strips. Cut the cucumber into long, thin batons (julienne).
- Assemble the Roll: Place your bamboo mat on a clean work surface. Lay one sheet of nori on top, shiny-side down. Have a small bowl of water nearby (Tezu). Dip your fingers in the water to prevent the rice from sticking to them. Take a handful of rice (about 1/4 of the total) and spread it evenly over the nori, leaving a 2cm border at the top edge. Be gentle and don't press down too hard.
- Add the Fillings: Arrange a line of your fillings (a few strips of salmon, avocado, and cucumber) horizontally across the centre of the rice. What works best for me is not to overfill the roll, as this makes it very difficult to close. Less is more!
- Roll the Sushi: Using the edge of the bamboo mat closest to you, lift it and start to roll it over the fillings, tucking the edge of the nori into the roll to secure them. Keep a firm, even pressure as you continue to roll away from you until the entire roll is formed. Squeeze the mat gently around the roll to compact it and ensure it's a tight cylinder.
- Slice and Serve: Use a very sharp, slightly wet knife to slice the roll. First, trim the uneven ends, then slice the log into 6-8 equal pieces. Wipe the knife with a damp cloth between each cut for the cleanest slices. Serve immediately with soy sauce, wasabi, and pickled ginger.
Notes
I really hope you give this sushi rolls recipe a try. Don’t be afraid to experiment with different fillings and find your favourite combinations. It’s such a rewarding and delicious skill to have. If you make these, please let me know how they turned out in the comments below. I’d love to hear about your sushi-making adventures! Happy rolling!
– Elena