Crispy Chicken Caesar Wrap Lunch
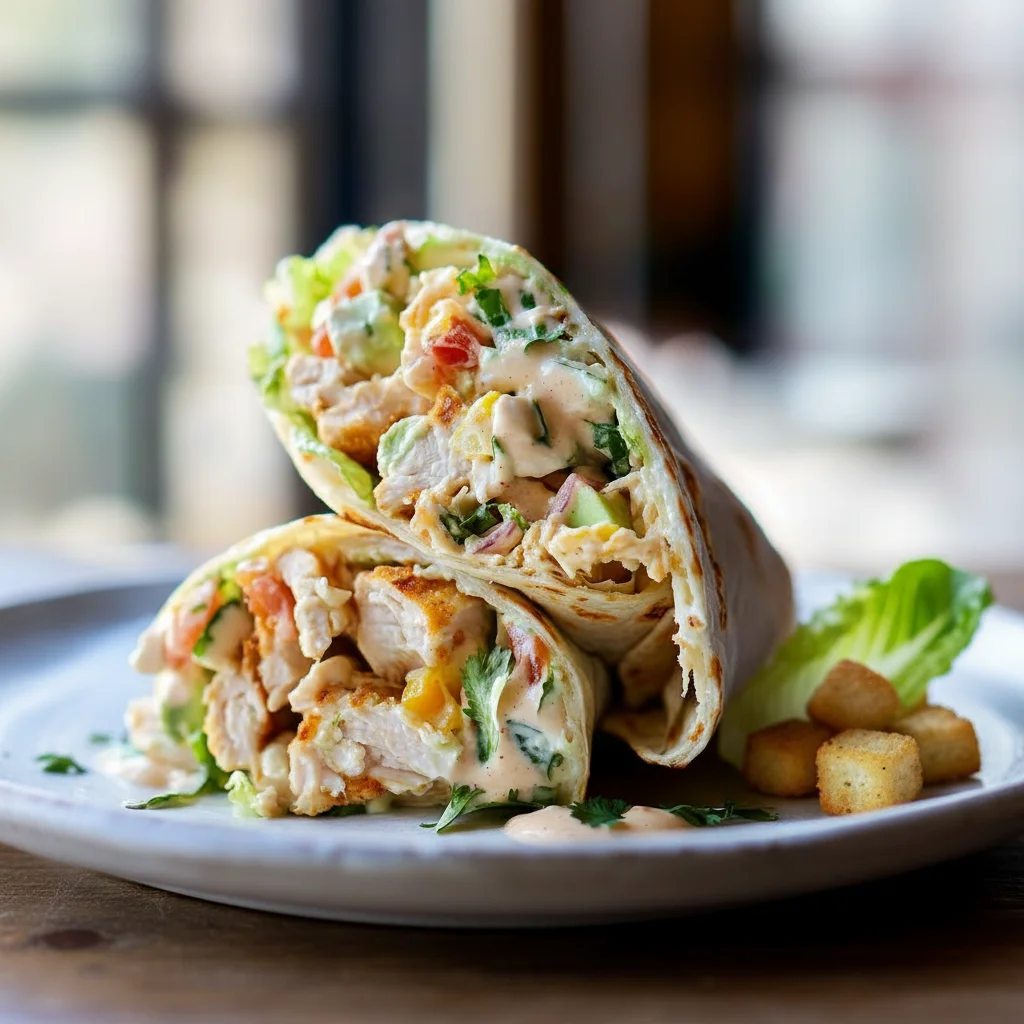
There’s a world of difference between a truly great Chicken Caesar Wrap and a mediocre one. We’ve all had them: the ones with limp lettuce, bland dressing, and dry chicken, all sadly swaddled in a cold, stiff tortilla. This recipe is the antidote to that culinary disappointment. It’s a celebration of crisp textures, juicy, well-seasoned chicken, and a creamy, tangy Caesar dressing that clings beautifully to every leaf of Romaine. Friends always ask me for this recipe after trying it at dinner parties; they can’t believe the dressing is homemade because it tastes so authentic.
What sets this particular Chicken Wrap apart is the attention to detail. We’re not just throwing ingredients together; we’re building layers of flavour. The chicken is pan-fried until it has a gorgeously golden crust, locking in all the juices. The dressing has that unmistakable salty, savoury depth from anchovies and garlic, balanced with sharp Parmesan and a squeeze of fresh lemon. And we even toast the wrap itself, just for a minute, to make it warm, pliable, and ever so slightly crisp at the edges. It transforms the entire experience.
This is a recipe for anyone who appreciates a classic done right. It works beautifully for a satisfying lunch that feels a little bit special, but it’s also substantial enough for a light dinner. It comes together in about 30 minutes, making it ideal for those busy weeknights when you want something genuinely delicious without spending hours in the kitchen. Let’s get started and make the best Chicken Caesar Wrap you’ve ever had.
Recipe Overview
This recipe guides you through creating a classic Chicken Caesar Wrap from scratch, focusing on a homemade dressing that truly shines. The result is a wrap packed with tender chicken, crisp lettuce, sharp Parmesan, and a dressing with a real depth of flavour. I’ve found that letting the dressing sit for just 10 minutes while you cook the chicken really helps the flavours meld together perfectly.
- Prep Time: 15 minutes
- Cook Time: 15 minutes
- Total Time: 30 minutes
- Servings: 4 wraps
- Difficulty: Easy
Why You’ll Love This Chicken Caesar Wrap
- Authentic Caesar Flavour: The homemade dressing is the star. It has that signature creamy, tangy, and umami-rich taste you get in a top-quality restaurant, thanks to real ingredients like anchovy, garlic, and freshly grated Parmesan.
- Ready in Under 30 Minutes: From start to finish, you can have these flavour-packed wraps on the table in about half an hour, making it a brilliant option for a speedy lunch or dinner.
- A Flexible Recipe: You can easily customise this Chicken Wrap. Add some crispy bacon lardons, a few slices of ripe avocado, or even swap the chicken for prawns. See my Classic Shrimp Scampi Recipe for a guide on cooking prawns perfectly.
- Great for Meal Prep: The components can be prepared ahead of time. Cook the chicken and make the dressing on a Sunday, and you have the makings of a fantastic lunch ready to assemble throughout the week.
- Family Tested: My whole family enjoys this one. The kids love the creamy dressing and crispy lettuce, and it’s a great way to get them to eat a balanced meal without any fuss. It always gets compliments.

Ingredients You’ll Need
For the best flavour, use high-quality ingredients. A good block of Parmesan, like Parmigiano-Reggiano, will make a world of difference compared to the pre-grated kind. I always use Filippo Berio Extra Virgin Olive Oil for my dressings for its smooth, rich taste.
- For the Chicken:
- 2 large skinless, boneless chicken breasts (approx. 500g total), sliced into 1cm thick strips
- 1 tbsp olive oil
- 1 tsp garlic powder
- 1/2 tsp salt
- 1/2 tsp black pepper
- For the Caesar Dressing:
- 1 large egg yolk
- 2 anchovy fillets in oil, finely minced
- 1 large garlic clove, crushed
- 1 tbsp fresh lemon juice
- 1 tsp Dijon mustard
- 1/2 tsp Worcestershire sauce
- 75ml extra virgin olive oil
- 40g Parmesan cheese, finely grated, plus extra for shaving
- Salt and freshly ground black pepper to taste
- For Assembly:
- 4 large flour tortillas or wraps
- 1 large head of Romaine lettuce, washed and roughly chopped
Elena’s Tip: If you’re wary of anchovies, don’t be! They melt into the dressing and you won’t taste fishiness, just a wonderful, deep savoury note that is essential for an authentic Caesar dressing.
How to Make This Chicken Caesar Wrap
The process is straightforward. We’ll start by making the dressing, then cook the chicken while the dressing’s flavours meld. The final step is simply assembling your delicious Caesar Wrap.
- Prepare the Dressing: In a medium bowl, whisk together the egg yolk, minced anchovies, crushed garlic, lemon juice, Dijon mustard, and Worcestershire sauce until well combined. The mixture will be quite thick.
- Emulsify the Oil: While whisking continuously, very slowly drizzle in the olive oil. Start with just a few drops at a time, then pour in a slow, steady stream. Continue whisking until the oil is fully incorporated and the dressing is thick and creamy. This is a key step for a stable emulsion, as explained on sites like Serious Eats.
- Finish the Dressing: Stir in the 40g of finely grated Parmesan cheese. Season with salt and a generous amount of black pepper. Taste and adjust the lemon juice or seasoning if needed. Set aside.
- Season and Cook the Chicken: Pat the chicken strips dry with a paper towel. In a bowl, toss them with 1 tbsp olive oil, garlic powder, salt, and pepper until evenly coated.
- Pan-Fry the Chicken: Heat a large frying pan or skillet over a medium-high heat. Once hot, add the chicken strips in a single layer (cook in two batches if necessary to avoid overcrowding). Cook for 3-4 minutes per side, until golden brown and cooked through. Remove from the pan and let it rest for a few minutes.
- Toss the Salad: In a large bowl, combine the chopped Romaine lettuce with the cooked chicken. Pour over about two-thirds of the Caesar dressing and toss gently until everything is lightly coated. What works best for me is using my hands to ensure every leaf gets a little dressing.
- Warm the Wraps: Heat a dry, clean frying pan over a medium heat. Warm each tortilla for about 20-30 seconds per side, just until it’s soft and pliable. This prevents them from cracking when you roll them.
- Assemble the Chicken Caesar Wrap: Lay a warm tortilla flat. Spoon a quarter of the chicken and lettuce mixture down the centre. Top with a few extra shavings of Parmesan cheese. Fold in the bottom edge, then fold in the sides, and roll up tightly to create your wrap. Repeat with the remaining ingredients. Serve immediately.
Tips From My Kitchen
- Room Temperature Ingredients: For the dressing, having the egg yolk and oil at room temperature helps them emulsify into a smooth, stable dressing much more easily. Take them out of the fridge about 30 minutes before you start.
- The Secret to Juicy Chicken: Don’t move the chicken strips around too much once they’re in the hot pan. Letting them sit for 3-4 minutes undisturbed allows them to develop a beautiful golden-brown crust, which adds so much flavour and texture. I learned that being patient with this step makes all the difference.
- Make-Ahead Method: You can make the Caesar dressing up to 3 days in advance and store it in an airtight jar in the fridge. The chicken can also be cooked, cooled, and stored for up to 2 days. This makes assembly for a quick lunch incredibly fast.
- Storage: Once assembled, these Chicken Caesar Wraps are best eaten straight away as the lettuce will soften over time. If you need to store leftovers, it’s better to keep the components separate in airtight containers in the fridge and assemble just before eating.
Common Mistakes to Avoid
- Overcrowding the Pan: When cooking the chicken, don’t cram all the pieces into the pan at once. This lowers the temperature, causing the chicken to steam rather than sear. It won’t develop that lovely golden crust. Cook in batches if your pan isn’t large enough.
- Using Cold Wraps: Trying to roll a cold tortilla straight from the packet often results in it cracking and splitting. A quick 20-second warm-up in a dry pan makes it soft, flexible, and much easier to work with.
- Forgetting to Rest the Chicken: It’s tempting to slice into the chicken right after it comes off the heat, but letting it rest for 5 minutes is crucial. This allows the juices to redistribute throughout the meat, ensuring every piece is tender and moist. As per guidance from the Food Standards Agency, ensure chicken is cooked through before resting.
Delicious Variations to Try
While this classic Chicken Caesar Wrap is fantastic as it is, feel free to get creative and adapt it to your taste. Here are a few ideas that work really well:
- A Spicy Kick: Add 1/2 teaspoon of chilli flakes or a dash of your favourite hot sauce to the Caesar dressing for a gentle background heat. You could also season the chicken with a pinch of cayenne pepper.
- Vegetarian Option: For a meat-free version, replace the chicken with crispy roasted chickpeas or pan-fried halloumi cheese. Omit the anchovies and add a teaspoon of capers to the dressing for a similar salty kick.
- Use a Different Protein: This wrap is wonderful with other proteins. Try it with flaked hot-smoked salmon or leftover grilled steak from a Savory Beef and Broccoli Stir Fry.
What to Serve With This Chicken Caesar Wrap
This wrap is a complete meal on its own, but if you want to make it part of a larger spread, here are a few suggestions that complement it beautifully:
- Sweet Potato Fries: The sweetness of the fries provides a lovely contrast to the savoury, tangy flavours of the wrap.
- A Simple Tomato Soup: A warm, comforting bowl of tomato soup makes this a perfect lunch combination, especially on a cooler day.
- Drink Pairing: A crisp, dry white wine like a Sauvignon Blanc cuts through the richness of the dressing wonderfully. For a non-alcoholic option, a sparkling water with a squeeze of fresh lemon is refreshing.
Frequently Asked Questions
Chicken Caesar Wrap
Ingredients
Method
- Prepare the Dressing: In a medium bowl, whisk together the egg yolk, minced anchovies, crushed garlic, lemon juice, Dijon mustard, and Worcestershire sauce until well combined. The mixture will be quite thick.
- Emulsify the Oil: While whisking continuously, very slowly drizzle in the olive oil. Start with just a few drops at a time, then pour in a slow, steady stream. Continue whisking until the oil is fully incorporated and the dressing is thick and creamy. This is a key step for a stable emulsion, as explained on sites like Serious Eats.
- Finish the Dressing: Stir in the 40g of finely grated Parmesan cheese. Season with salt and a generous amount of black pepper. Taste and adjust the lemon juice or seasoning if needed. Set aside.
- Season and Cook the Chicken: Pat the chicken strips dry with a paper towel. In a bowl, toss them with 1 tbsp olive oil, garlic powder, salt, and pepper until evenly coated.
- Pan-Fry the Chicken: Heat a large frying pan or skillet over a medium-high heat. Once hot, add the chicken strips in a single layer (cook in two batches if necessary to avoid overcrowding). Cook for 3-4 minutes per side, until golden brown and cooked through. Remove from the pan and let it rest for a few minutes.
- Toss the Salad: In a large bowl, combine the chopped Romaine lettuce with the cooked chicken. Pour over about two-thirds of the Caesar dressing and toss gently until everything is lightly coated. What works best for me is using my hands to ensure every leaf gets a little dressing.
- Warm the Wraps: Heat a dry, clean frying pan over a medium heat. Warm each tortilla for about 20-30 seconds per side, just until it's soft and pliable. This prevents them from cracking when you roll them.
- Assemble the Chicken Caesar Wrap: Lay a warm tortilla flat. Spoon a quarter of the chicken and lettuce mixture down the centre. Top with a few extra shavings of Parmesan cheese. Fold in the bottom edge, then fold in the sides, and roll up tightly to create your wrap. Repeat with the remaining ingredients. Serve immediately.
Notes
I really hope you give this Chicken Caesar Wrap recipe a go. It’s one of those meals that proves simple, fresh ingredients can create something truly special. This is my go-to recipe when I need something quick but impressive. Let me know how you get on in the comments below – I’d love to hear if you enjoyed it as much as my family and I do! Happy cooking!
– Elena